Quantcast
Channel: w3cplus
Viewing all 1557 articles
Browse latest View live

css3选项卡标题样式设计1

$
0
0
css3选项卡标题样式设计1

说起来惭愧,这个实例以前看起来的时候,看得莫名其妙,一时云里雾里。于是静下心来仔细研究下,才终于发现这个窍门。这里我们看到的选项卡tabs标题的高度并不是由height来撑起来了,各位firebug就可以知道了,设置的height是为0,然后line-height为30px,其实这个还不是关键,关键在于设计了border-bottom为30px。至于上面的那个斜角效果则是border-right为transparent。鼠标滑过的颜色是通过改变border-bottom-colo来改变的,至于重叠的部分则是用了margin-right为负值。没有:before&:after一样拿下斜角效果。不得不说这又是border的一个杰作,加上上一个实例,不得不感叹我们对于这个border生成三角形的效果运用还是太基础啊,人家这才是高水平的应用。

demodownload

css主要代码:

#tabs {
  overflow: hidden;
  width: 100%;
  margin: 0;
  padding: 0;
  list-style: none;
}

#tabs li {
  float: left;
  margin: 0 -15px 0 0;
}

#tabs a {
  float: left;
  position: relative;
  padding: 0 40px;
  height: 0; 
  line-height: 30px;
  text-transform: uppercase;
  text-decoration: none;
  color: #fff;
  border-right: 30px solid transparent;
  border-bottom: 30px solid #3D3D3D;
  border-bottom-color: #777\9;
  opacity: .3;
  filter: alpha(opacity=30);	  
}

#tabs a:hover,
#tabs a:focus {
  border-bottom-color: #2ac7e1;
  opacity: 1;
  filter: alpha(opacity=100);
}

#tabs a:focus {
  outline: 0;
}

#tabs #current {
  z-index: 3;
  border-bottom-color: #3d3d3d;
  opacity: 1;
  filter: alpha(opacity=100);	  
}

demodownload

查看更多:http://www.red-team-design.com/google-play-minimal-tabs-with-css3-jquery


css3选项卡标题样式设计2

$
0
0
css3选项卡标题样式设计2

本实例的tabs斜角效果跟border没有一毛钱关系了,呵呵也跟:before和:after没有关系,却是运用了渐变背景制作的。给了一个角度的渐变,由transparent到红色的220度渐变。然后设置了一个box-shadow的左右偏移为负,使右侧看起来颜色比较深。

demodownload

css主要代码:

#tabs
{
  overflow: auto;
  width: 100%;
  list-style: none;
  margin: 0;
  padding: 0;
}

#tabs li
{
    margin: 0;
    padding: 0;
    float: left;
}

#tabs a
{
    -moz-box-shadow: -4px 0 0 rgba(0, 0, 0, .2);
    -webkit-box-shadow: -4px 0 0 rgba(0, 0, 0, .2);
    box-shadow: -4px 0 0 rgba(0, 0, 0, .2);
    background: #ad1c1c;
    background:    -moz-linear-gradient(220deg, transparent 10px, #ad1c1c 10px);
    background:    -webkit-linear-gradient(220deg, transparent 10px, #ad1c1c 10px);     
    background:     -ms-linear-gradient(220deg, transparent 10px, #ad1c1c 10px); 
    background:      -o-linear-gradient(220deg, transparent 10px, #ad1c1c 10px); 
    background:         linear-gradient(220deg, transparent 10px, #ad1c1c 10px);
    text-shadow: 0 1px 0 rgba(0,0,0,.5);
    color: #fff;
    float: left;
    font: bold 12px/35px 'Lucida sans', Arial, Helvetica;
    height: 35px;
    padding: 0 30px;
    text-decoration: none;
}

#tabs a:hover
{
    background: #c93434;
    background:    -moz-linear-gradient(220deg, transparent 10px, #c93434 10px);
    background:    -webkit-linear-gradient(220deg, transparent 10px, #c93434 10px);     
    background:     -ms-linear-gradient(220deg, transparent 10px, #c93434 10px); 
    background:      -o-linear-gradient(220deg, transparent 10px, #c93434 10px); 
    background:         linear-gradient(220deg, transparent 10px, #c93434 10px);     
}

#tabs a:focus
{
    outline: 0;
}

#tabs #current a
{
    background: #fff;
    background:    -moz-linear-gradient(220deg, transparent 10px, #fff 10px);
    background:    -webkit-linear-gradient(220deg, transparent 10px, #fff 10px);     
    background:     -ms-linear-gradient(220deg, transparent 10px, #fff 10px); 
    background:      -o-linear-gradient(220deg, transparent 10px, #fff 10px); 
    background:         linear-gradient(220deg, transparent 10px, #fff 10px);
    text-shadow: none;    
    color: #333;
}

#content
{
    background-color: #fff;
    background-image: -webkit-gradient(linear, left top, left bottom, from(#fff), to(#ddd));
    background-image: -webkit-linear-gradient(top, #fff, #ddd); 
    background-image:    -moz-linear-gradient(top, #fff, #ddd); 
    background-image:     -ms-linear-gradient(top, #fff, #ddd); 
    background-image:      -o-linear-gradient(top, #fff, #ddd); 
    background-image:         linear-gradient(top, #fff, #ddd);
    -moz-border-radius: 0 2px 2px 2px;
    -webkit-border-radius: 0 2px 2px 2px;
    border-radius: 0 2px 2px 2px;
    -moz-box-shadow: 0 2px 2px #000, 0 -1px 0 #fff inset;
    -webkit-box-shadow: 0 2px 2px #000, 0 -1px 0 #fff inset;
    box-shadow: 0 2px 2px #000, 0 -1px 0 #fff inset;
    padding: 30px;
}

/* Remove the rule below if you want the content to be "organic" */
#content div
{
    height: 220px; 
}

demodownload

查看更多:http://www.red-team-design.com/css3-tabs-with-beveled-corners

css3选项卡标题样式设计3

$
0
0
css3选项卡标题样式设计3

这是第三个tabs的标题设计了,这次应用的又跟上两个不是一样的技术。这里用了:after来生成了,然后对生成的内容水平方向上扭曲skewX来达到斜切的效果。当然li的margin距离要刚好等于生成a:after生成内容的宽度。然后就是注意box-shadow了。注意火狐14.0更新后,skew得写成skewX或skewY分别表示水平方向和竖直方向偏移,这里它的demo用的是skew,所以火狐下并没有斜切的效果,我们可以firebug手动添加。

demodownload

css主要代码:

#tabs{
  overflow: hidden;
  width: 100%;
  margin: 0;
  padding: 0;
  list-style: none;
}

#tabs li{
  float: left;
  margin: 0 .5em 0 0;
}

#tabs a{
  position: relative;
  background: #ddd;
  background-image: linear-gradient(to bottom, #fff, #ddd);  
  padding: .7em 3.5em;
  float: left;
  text-decoration: none;
  color: #444;
  text-shadow: 0 1px 0 rgba(255,255,255,.8);
  border-radius: 5px 0 0 0;
  box-shadow: 0 2px 2px rgba(0,0,0,.4);
}

#tabs a:hover,
#tabs a:hover::after,
#tabs a:focus,
#tabs a:focus::after{
  background: #fff;
}

#tabs a:focus{
  outline: 0;
}

#tabs a::after{
  content:'';
  position:absolute;
  z-index: 1;
  top: 0;
  right: -.5em;  
  bottom: 0;
  width: 1em;
  background: #ddd;
  background-image: linear-gradient(to bottom, #fff, #ddd);  
  box-shadow: 2px 2px 2px rgba(0,0,0,.4);
  transform: skew(10deg);
  border-radius: 0 5px 0 0;  
}

#tabs #current a,
#tabs #current a::after{
  background: #fff;
  z-index: 3;
}

#content
{
    background: #fff;
    padding: 2em;
    height: 220px;
    position: relative;
    z-index: 2;	
    border-radius: 0 5px 5px 5px;
    box-shadow: 0 -2px 3px -2px rgba(0, 0, 0, .5);
}

demodownload

查看更多:http://www.red-team-design.com/css3-jquery-folder-tabs

css3面包屑设计

$
0
0
css3面包屑设计

这里总共有四种面包屑效果,其中第一种运用:before和:after,运用border生成同等大小的尖角,叠加起来左右错动1px;第二个还是运用:before和:after,运用border生成不同的尖角,一个在左一个在右;第三个是运用一个:after生成一个正方形,设置border-radius然后rotate旋转45度;第四个直接运用水平扭曲就skewX就可以了。

demodownload

css主要代码:

/*demo1*/
#breadcrumbs-one{
  background: #eee;
  border-width: 1px;
  border-style: solid;
  border-color: #f5f5f5 #e5e5e5 #ccc;
  border-radius: 5px;
  box-shadow: 0 0 2px rgba(0,0,0,.2);
  overflow: hidden;
  width: 100%;
}

#breadcrumbs-one li{
  float: left;
}

#breadcrumbs-one a{
  padding: .7em 1em .7em 2em;
  float: left;
  text-decoration: none;
  color: #444;
  position: relative;
  text-shadow: 0 1px 0 rgba(255,255,255,.5);
  background-color: #ddd;
  background-image: linear-gradient(to right, #f5f5f5, #ddd);  
}

#breadcrumbs-one li:first-child a{
  padding-left: 1em;
  border-radius: 5px 0 0 5px;
}

#breadcrumbs-one a:hover{
  background: #fff;
}

#breadcrumbs-one a::after,
#breadcrumbs-one a::before{
  content: "";
  position: absolute;
  top: 50%;
  margin-top: -1.5em;   
  border-top: 1.5em solid transparent;
  border-bottom: 1.5em solid transparent;
  border-left: 1em solid;
  right: -1em;
}

#breadcrumbs-one a::after{ 
  z-index: 2;
  border-left-color: #ddd;  
}

#breadcrumbs-one a::before{
  border-left-color: #ccc;  
  right: -1.1em;
  z-index: 1; 
}

#breadcrumbs-one a:hover::after{
  border-left-color: #fff;
}

#breadcrumbs-one .current,
#breadcrumbs-one .current:hover{
  font-weight: bold;
  background: none;
}

#breadcrumbs-one .current::after,
#breadcrumbs-one .current::before{
  content: normal;  
}

/*demo2*/
#breadcrumbs-two{
  overflow: hidden;
  width: 100%;
}

#breadcrumbs-two li{
  float: left;
  margin: 0 .5em 0 1em;
}

#breadcrumbs-two a{
  background: #ddd;
  padding: .7em 1em;
  float: left;
  text-decoration: none;
  color: #444;
  text-shadow: 0 1px 0 rgba(255,255,255,.5); 
  position: relative;
}

#breadcrumbs-two a:hover{
  background: #99db76;
}

#breadcrumbs-two a::before{
  content: "";
  position: absolute;
  top: 50%; 
  margin-top: -1.5em;   
  border-width: 1.5em 0 1.5em 1em;
  border-style: solid;
  border-color: #ddd #ddd #ddd transparent;
  left: -1em;
}

#breadcrumbs-two a:hover::before{
  border-color: #99db76 #99db76 #99db76 transparent;
}

#breadcrumbs-two a::after{
  content: "";
  position: absolute;
  top: 50%; 
  margin-top: -1.5em;   
  border-top: 1.5em solid transparent;
  border-bottom: 1.5em solid transparent;
  border-left: 1em solid #ddd;
  right: -1em;
}

#breadcrumbs-two a:hover::after{
  border-left-color: #99db76;
}

#breadcrumbs-two .current,
#breadcrumbs-two .current:hover{
  font-weight: bold;
  background: none;
}

#breadcrumbs-two .current::after,
#breadcrumbs-two .current::before{
  content: normal;
}

/*demo3*/
#breadcrumbs-three{
  overflow: hidden;
  width: 100%;
}

#breadcrumbs-three li{
  float: left;
  margin: 0 2em 0 0;
}

#breadcrumbs-three a{
  padding: .7em 1em .7em 2em;
  float: left;
  text-decoration: none;
  color: #444;
  background: #ddd;  
  position: relative;
  z-index: 1;
  text-shadow: 0 1px 0 rgba(255,255,255,.5);
  border-radius: .4em 0 0 .4em;  
}

#breadcrumbs-three a:hover{
  background: #abe0ef;
}

#breadcrumbs-three a::after{
  background: #ddd;
  content: "";
  height: 2.5em;
  margin-top: -1.25em;
  position: absolute;
  right: -1em;
  top: 50%;
  width: 2.5em;
  z-index: -1; 
  transform: rotate(45deg);
  border-radius: .4em;
}

#breadcrumbs-three a:hover::after{
  background: #abe0ef;
}

#breadcrumbs-three .current,
#breadcrumbs-three .current:hover{
  font-weight: bold;
  background: none;
}

#breadcrumbs-three .current::after{
  content: normal;
}

demodownload

查看更多:http://www.red-team-design.com/css3-breadcrumbs

css3标题设计

$
0
0
css3标题设计

本实例主要是对:before及:after的应用,比较初级,浅显易懂,适合入门。第一个使用border-left和负margin,跟css3没有关系,就是应用了rgba这个属性,使border的颜色有一定的透明值;第二个运用:before和:after生成两个三角叠加起来;第三个背景应用了linear-gradient,然后加上:before和:after生成的三角左右两边各一个;第四个则应用了:after生成元素,然后box-shadow生成阴影,再加上rotate旋转一点角度。这四个虽然比较简单,但是还是非常实用的。

demodownload

css主要代码:

/*demo1*/
.headline1 {
	border-bottom: 1px dashed #aaa;
	border-left: 7px solid #aaa;		
	border-left: 7px solid rgba(0,0,0,.2);
	margin: 0 -15px 15px -22px;
	padding: 5px 15px;
}
/*demo2*/
.headline2 {
	border-bottom: 1px solid #aaa;
	margin: 15px 0;
	padding: 5px 0;
	position: relative;
}

.headline2:before,
.headline2:after{
	content: '';
	border-right: 20px solid #fff;
	border-top: 15px solid #aaa;
	bottom: -15px;
	position: absolute;
	left: 25px;
}

.headline2:after{
	border-top-color: #fff;
	border-right-color: transparent;
	bottom: -13px;
	left: 26px;
}
/*demo3*/
.headline3{
  position: relative;
  margin-left: -22px; /* 15px padding + 7px border ribbon shadow*/
  margin-right: -22px;
  padding: 15px;
  background: #e5e5e5;
  background: -moz-linear-gradient(#f5f5f5, #e5e5e5);
  background: -webkit-gradient(linear, left top, left bottom, from(#f5f5f5), to(#e5e5e5));
  background: -webkit-linear-gradient(#f5f5f5, #e5e5e5);
  background: -o-linear-gradient(#f5f5f5, #e5e5e5);
  background: -ms-linear-gradient(#f5f5f5, #e5e5e5);
  background: linear-gradient(#f5f5f5, #e5e5e5);
  -webkit-box-shadow: 0 -1px 0 rgba(255,255,255,.8) inset;
  -moz-box-shadow: 0 -1px 0 rgba(255,255,255,.8) inset;
  box-shadow: 0 -1px 0 rgba(255,255,255,.8) inset;
  text-shadow: 0 1px 0 #fff;
}

.headline3:before, .headline3:after{
  position: absolute;
  left: 0;
  bottom: -6px;
  content:'';
  border-top: 6px solid #555;
  border-left: 6px solid transparent;
}

.headline3:before{
  border-top: 6px solid #555;
  border-right: 6px solid transparent;
  border-left: none;
  left: auto;
  right: 0;
  bottom: -6px;
}
/*demo4*/
.headline4{
	position: relative;
	border-color: #eee;
	border-style: solid;
	border-width: 5px 5px 5px 0;
	background: #fff;
	margin: 0 0 15px -15px;
	padding: 5px 15px;
	-moz-box-shadow: 1px 1px 1px rgba(0,0,0,.3);
	-webkit-box-shadow: 1px 1px 1px rgba(0,0,0,.3);
	box-shadow: 1px 1px 1px rgba(0,0,0,.3);
}

.headline4:after
{
	content: "";
	position: absolute;
	z-index: -1;
	bottom: 15px;
	right: 15px;
	width: 70%;
	height: 10px;
	background: rgba(0, 0, 0, .7);
	-webkit-box-shadow: 0 15px 10px rgba(0,0,0, .7);
	-moz-box-shadow: 0 15px 10px rgba(0, 0, 0, .7);
	box-shadow: 0 15px 10px rgba(0, 0, 0, .7);
	-webkit-transform: rotate(2deg);
	-moz-transform: rotate(2deg);
	-o-transform: rotate(2deg);
	-ms-transform: rotate(2deg);
	transform: rotate(2deg);		
}

demodownload

查看更多:http://www.red-team-design.com/cool-headings-with-pseudo-elements

css3导航设计1

$
0
0
css3导航设计1

本实例通过:before和:after生成高度和宽度透明度都为0且背景为渐变的两个内容,两个不同点在于绝对定位的位置一个为left,一个为right,然后渐变背景的方向刚好相反;最后当鼠标滑过改变高度宽度及透明度,就完成了该动画。因为是对:hover状态下的:before和:after生成的内容进行宽度变化,所以该实例如同先前的那个:hover状态下的激发伪元素动画一样,webkit内核是不支持的。

demodownload

css主要代码为:

.effects:after, .effects:before {
    -moz-transition:width 0.5s ease 0s;
    height: 0px;
    width: 0px;
    position: absolute;
    content: ' ';
    display: block;
    opacity:0;
    box-shadow: 0px 0px 5px #00c6ff;
}

.effects:after {
    background: -moz-linear-gradient(left, #0ad, #08b);
    top: 84px;
    left: 75px;
}

.effects:before {
    background: -moz-linear-gradient(right, #0ad, #08b);
    top: 84px;
    right:75px;
}

.effects:hover:after, .effects:hover:before{
    width: 72px;
    height: 1px;
    opacity:1;
} 

demodownload

更多资料:http://www.alessioatzeni.com/blog/css3-navigation-with-transitions/

纯css3列表切换动画

$
0
0
纯css3列表切换动画

本实例的思路和之前说的用radio来控制手风琴效果有异曲同工之效。主要应用radio单选按钮来确认状态,然后对这个状态下的兄弟元素进行css控制。当然这里不比手风琴有几个radio就有几个内容,这里是一个内容,所以所有的radio应该和这个内容是兄弟元素,以便使用兄弟元素选择器~。

demodownload

html主要代码:

<input name="view-control" class="view-control-1" checked="checked" type="radio">
<span class="control first"><img src="images/blockinline.png"></span>
			
<input name="view-control" class="view-control-2" type="radio">
<span class="control"><img src="images/plainlist.png"></span>

<!-- to n controller -->
			
<ul id="item-list">
	<li>
		<img src="images/angrybird.png">
		<p><span class="title">Angry Birds Space Premium</span><span class="developer">Rovio Mobile Ltd.</span></p>
	</li>
	<li>
		<img src="images/omgpop.png">
		<p><span class="title">Draw Something</span><span class="developer">OMGPOP</span></p>
	</li>
	<li>
		<img src="images/cuttherope.png">
		<p><span class="title">Cut the Rope</span><span class="developer">ZeptoLab</span></p>
	</li>
	<!-- to n list -->
</ul>

css主要代码:

input[type=radio] {
	position: absolute;
	z-index: 100;
	opacity: 0;
	cursor: pointer;
	height: 110px;
	width: 40px;
	margin-top: -7em;
}
.control {
	display: inline-block;
	margin: 0 -.13em;
	width: 40px;
	background: #eddfc7;
	padding: 5px 3px 1px 2px;
	border-right: 1px solid #e0cba0;
	cursor: pointer;
	vertical-align: bottom;
}	
.control:hover, 
	input[type=radio]:hover + .control, 
	input[type=radio]:checked + .control {
	box-shadow: inset 0px 0px 20px #d3b67a;
}
#item-list {
	margin-top: 2em;
	padding: 0;
	list-style-type: none;
	text-align: left;
}
#item-list li {
	display: inline-block;
	width: 300px;
	vertical-align: top;
	margin: 0 0.5em 1em 0;
	padding: 10px;
	background: #f3eada;
	border-radius: 5px;
	box-shadow: inset 0px 0px 20px #e0cba0;
	overflow: hidden;
}
/*list 1*/
.view-control-1:checked ~ #item-list li img {
	opacity: 1;
	width: 100px;
	visibility: visible;
	transition: .4s .4s ease-out;
}
	
.view-control-1:checked ~ #item-list li p {
	opacity: 1;
	visibility: visible;
	transition: .4s ease-out;
}
	
.view-control-1:checked ~ #item-list li {
	width: 300px;
	transition: .4s ease-out;
}
/*list 2*/
.view-control-2:checked ~ #item-list li img {
	opacity: 0;
	width: 0;
	visibility: hidden;
	transition: .4s ease-out;
}
	
.view-control-2:checked ~ #item-list li p {
	opacity: 1;
	visibility: visible;
	transition: .4s ease-out;
}
	
.view-control-2:checked ~ #item-list li {
	width: 900px;
	transition: .4s .4s ease-out;
}	
/*list 3*/
.view-control-3:checked ~ #item-list li img {  
	opacity: 1;  
	width: 100;  
	visibility: visible;  
	transition: .4s ease-out;  
}  
	  
.view-control-3:checked ~ #item-list li p {  
	opacity: 1;  
	visibility: visible;  
	transition: .4s ease-out;  
}  
	  
.view-control-3:checked ~ #item-list li {  
	width: 900px;  
	transition: .4s ease-out;  
}     
/*list 4*/
.view-control-4:checked ~ #item-list li img {  
	opacity: 1;  
	width: 100;  
	visibility: visible;  
	transition: .4s ease-out;  
}     
	  
.view-control-4:checked ~ #item-list li p {  
	opacity: 0;  
	position: absolute;  
	visibility: hidden;  
	transition: .4s ease-out;  
}  
	  
.view-control-4:checked ~ #item-list li {  
	width: 100px;  
	transition: .4s ease-out;  
}

demodownload

查看更多:http://www.webstuffshare.com/2012/04/how-to-create-animated-list-view-using-css3-only/

css3大背景运动

$
0
0
css3大背景运动

其实这个的大背景运用和之前背景运动的那个demo,核心点都是一样的,关键就是animation对背景定位的改变。只不过这里我们在一个标签中同时应用了三张图片,注意多背景图片时其层次与其书写顺序有关,其层次高低随着书写顺序依次递减,所以第一张图片在最高层,所以这个时候千万不要定义背景色啊,不然会把后面的全部覆盖了。如果要写背景色的话,请在最后一张图片上面加上。同理你可以做个简单的飘雪或蒲公英散落等一些零散的效果,当然首先得把背景图片设计好。

demodownload

css主要代码:

body{
	background:url('../images/foreground.png') 5px 5px,url("../images/midground.png") 1050px 750px,url("../images/background.png") 1000px -50px;

	-moz-animation-name:bgmove;
	-moz-animation-duration:30s;
	-moz-animation-timing-function:linear;
	-moz-animation-delay:0;
	-moz-animation-iteration-count:infinite;
		
	-webkit-animation-name:bgmove;
	-webkit-animation-duration:30s;
	-webkit-animation-timing-function:linear;
	-webkit-animation-delay:0;
	-webkit-animation-iteration-count:infinite;
		
	animation-name:bgmove;
	animation-duration:30s;
	animation-timing-function:linear;
	animation-delay:0;
	animation-iteration-count:infinite;
}
@-moz-keyframes bgmove{
    0%{
        background:url('../images/foreground.png') 5px 5px,url("../images/midground.png") 1050px 750px,url("../images/background.png") 1000px -50px;
    }
    100%{
        background:url('../images/foreground.png') 2005px 1005px,url("../images/midground.png") 50px -250px,url("../images/background.png") 0 950px;

    }
}
@-webkit-keyframes bgmove{
    0%{
        background:url('../images/foreground.png') 5px 5px,url("../images/midground.png") 1050px 750px,url("../images/background.png") 1000px -50px;
    }
    100%{
        background:url('../images/foreground.png') 2005px 1005px,url("../images/midground.png") 50px -250px,url("../images/background.png") 0 950px;
    }
}

demodownload

灵感及文中所用图片来源:http://www.paulrhayes.com/2009-04/auto-scrolling-parallax-effect-without-javascript/


css3图片与文字3D transform切换

$
0
0
css3图片与文字3D transform切换

这是个3D的切换效果,不太明白,在我的概念里还没有建立好一个3D模型,不知道如何把一个二维的图形如何转成三维。更谈不上动画了,所以这个案例对于我来说,暂时只是欣赏。如有明白的可以给讲一下,先谢过。

如果你对3D也懂得话,可以从这里学习下,非常棒的一篇文章:http://www.zhangxinxu.com/wordpress/2012/09/css3-3d-transform-perspective-animate-transition/

demodownload

css主要代码:

.wrapper {
  display: inline-block;
  width: 310px;
  height: 100px;
  vertical-align: top;
  margin: 1em 1.5em 2em 0;
  cursor: pointer;
  position: relative;
  font-family: Tahoma, Arial;
  perspective: 4000px;
}

.item {
  height: 100px;
  transform-style: preserve-3d;
  transition: transform .6s;
}
.item img {
  display: block;
  position: absolute;
  top: 0;
  border-radius: 3px;
  box-shadow: 0px 3px 8px rgba(0,0,0,0.3);
  transform: translateZ(50px);
  transition: all .6s;
  
}

.item .information {
  display: block;
  position: absolute;
  top: 0;
  height: 80px;
  width: 290px;
  text-align: left;
  border-radius: 15px;
  padding: 10px;
  font-size: 12px;
  text-shadow: 1px 1px 1px rgba(255,255,255,0.5);
  box-shadow: none;
  background: linear-gradient(to bottom,rgba(236,241,244,1) 0%,rgba(190,202,217,1) 100%);
  transform: rotateX(-90deg) translateZ(50px);
  transition: all .6s;
  
}
.item:hover {
  transform: translateZ(-50px) rotateX(95deg);
}

  .item:hover img {
    box-shadow: none;
    border-radius: 15px;
  }
  
  .item:hover .information {
    box-shadow: 0px 3px 8px rgba(0,0,0,0.3);
    border-radius: 3px;
  }

demodownload

查看更多:http://www.webstuffshare.com/2012/04/showing-product-information-with-css3-3d-transform/

css3 3D图片展

$
0
0
css3 3D图片展

再来一个css3 3D效果的实例,哈哈。今天在群里看到有人推荐张鑫旭的css3 3D文章,去看了下,太棒了,想学css3 3D特效的必备学习参考资料啊,所以晚上回来更新了下上一篇文章,把那篇文章的地址贴进去了。顺便再来一个css3 3D特效,不管会不会,观赏下开开眼界吧。注意demo为wekit版本(为了尊重作者我们贴出的demo地址都为原来的地址,而download则全部从本站下站),如需查看火狐版请download

demodownload

css主要代码:

/* Animations with keyframes */
@-webkit-keyframes x_rot {
    0%    { -webkit-transform: rotateX(-30deg); }
    50%   { -webkit-transform: rotateX(30deg); }
    100%  { -webkit-transform: rotateX(-30deg); }
}
@-webkit-keyframes y_rot {
    0%    { -webkit-transform: rotateY(0deg); }
    50%   { -webkit-transform: rotateY(180deg); }
    100%  { -webkit-transform: rotateY(360deg); }
}

/* main styles */
.slider {
    margin: 250px auto;

    -webkit-perspective: 1000; /* setup perspective to parent */
}
.x_rot {
    -webkit-transform-style: preserve-3d;
    -webkit-animation-name: x_rot; /* setup custom animations */
    -webkit-animation-duration: 6s;
    -webkit-animation-iteration-count: infinite;
    -webkit-animation-timing-function: ease;
}
.y_rot {
    -webkit-transform-style: preserve-3d;
    -webkit-animation-name: y_rot; /* setup custom animations */
    -webkit-animation-duration: 10s;
    -webkit-animation-iteration-count: infinite;
    -webkit-animation-timing-function: linear;
}
.y_rot div {
    color: rgba(0,0,0,0.9);
    height: 235px;
    left: 300px;
    opacity: 0.8;
    position: absolute;
    width: 235px;

    -webkit-border-radius: 15px;
    -webkit-transition: .3s;
}
.y_rot div#i1 {
    -webkit-transform: rotateY(0deg) translateZ(200px);
}
.y_rot div#i2 {
    -webkit-transform: rotateY(60deg) translateZ(200px);
}
.y_rot div#i3 {
    -webkit-transform: rotateY(120deg) translateZ(200px);
}
.y_rot div#i4 {
    -webkit-transform: rotateY(180deg) translateZ(200px);
}
.y_rot div#i5 {
    -webkit-transform: rotateY(240deg) translateZ(200px);
}
.y_rot div#i6 {
    -webkit-transform: rotateY(300deg) translateZ(200px);
}
.y_rot div img {
    height:235px;
    width:235px;

    -webkit-border-radius: 15px;
    -webkit-transition: .3s;
}

/* onhover effect */
.y_rot div#i1:hover,
.y_rot div#i2:hover,
.y_rot div#i3:hover,
.y_rot div#i4:hover,
.y_rot div#i5:hover,
.y_rot div#i6:hover {
    opacity: 1;
}
.y_rot div#i1:hover img,
.y_rot div#i2:hover img,
.y_rot div#i3:hover img,
.y_rot div#i4:hover img,
.y_rot div#i5:hover img,
.y_rot div#i6:hover  img{
    height:335px;
    width:335px;
    margin-left:-50px;
    margin-top:-50px;
}

/* pause main animation onhover */
.x_rot:hover {
    -webkit-animation-play-state: paused;
}
.y_rot:hover {
    -webkit-animation-play-state: paused;
}

demodownload

查看更多:http://www.script-tutorials.com/css3-animated-photo-slider/

css3按钮大集合

$
0
0
css3按钮大集合

用css3来制作按钮,不论对于初学者还是想提高的都是一门可以研究的东西,一开始其用到的属性一般为gradient、border-raidus、rgba、text-shadow、font-face,然后随着css3的发展,又加入了用font-face的icon、伪元素、动画、3D等等。这里我们收集一批css3制作的精致按钮,对于初学者,可以顺便学学这些简单的属性,而对于提高者也可以扩展下视野,激活下灵感。

BonBon Buttons

001-CSSbutton-2

Dark Navigation Menu Buttons Design with CSS

111-jQuerybutton

Animated Buttons using CSS3 Transitions and Transforms

071-CSSbutton

CSS3 Pictogram Button

Pure CSS 3D Button

073-jQuerybutton

Creating 3D Buttons with CSS and jQuery

074-jQuerybutton

Create CSS Circle Buttons

061-CSSbutton

Radioactive Buttons

032-CSSbutton

Pure CSS Web Button

102-jQuerybutton

Slick CSS3 Buttons with Box-Shadow and RGBA

105-jQuerybutton

Super Awesome Buttons with CSS and RGBA

007-CSSbutton

CSS Animated Bubble Buttons

078-jQuerybutton

Glow Buttons

051-CSSbutton

How to Make Sexy Buttons With CSS

107-jQuerybutton

Pretty CSS3 Buttons

023-CSSbutton

Using Pictogram Webfont for Replacing Image

Free PSD : Sticker Buttons

Free Zocial Button Set: Social CSS3 Buttons

Pure CSS3 Customizable Pressure Buttons

Pure CSS3 Customizable Pressure Buttons

How to Create CSS3 Buttons

Buttons-2-css3-text-effect-tutorials

持续更新中……

查看更多:http://www.webdesignshock.com/css-button

css3 3D动画效果

$
0
0
css3 3D动画效果

呵呵又来一个3D制作,就不相信搞不定3D是吧。多看几个demo,多实践下,整个简单的3D原来也没想象的那么难的,还是可以搞定的。这个案例出现的还是很早的,只是当时只拿来欣赏吧,现在终于可以拿过来分析分析了。本实例先给li元素设置一个透视值为500px,然后给图片和文字信息都设置一个Y轴上的旋转30度,即rotateY(30deg),然后要实现文字和图片有个层级的效果,就给文字设置了Z轴上的偏移,即translateZ(30px),这样一个3D效果就出来了,至于动画部分就是hover的时候rotateY为0。这个demo问世的时候只有谷歌浏览器支持,所以请用google浏览器查看效果,至于download的文件已经经过我的修改,不过鼠标滑过的时候还是有bug,不太明白为什么,希望高手可以指点下。

demodownload

css主要代码:

#movieposters li {
	display: inline;
	float: left;
	-webkit-perspective: 500px;
	-webkit-transform-style: preserve-3d;

	-moz-perspective: 500px;
	-moz-transform-style: preserve-3d;
}
#movieposters li img {
	border: 10px solid #fcfafa;
	box-shadow: 0 3px 10px #888;
	-webkit-transform: rotateY(30deg);
	-webkit-transition-property: -webkit-transform;
	-webkit-transition-duration: 0.5s;

	-moz-transform: rotateY(30deg);
	-moz-transition-property: -moz-transform;
	-moz-transition-duration: 0.5s;
}
#movieposters li:hover img {
	-webkit-transform: rotateY(0deg);
	-moz-transform: rotateY(0deg);
}
.movieinfo {
	border: 10px solid #fcfafa;
	padding: 20px;
	width: 200px;
	height: 180px;
	background-color: #deddcd;
	margin: -195px 0 0 55px;
	position: absolute;
	-moz-box-shadow: 0 20px 40px #888;
	-webkit-box-shadow: 0 20px 40px #888;
	-webkit-transform: translateZ(30px) rotateY(30deg);
	-webkit-transition-property: -webkit-transform, box-shadow, margin;
	-webkit-transition-duration: 0.5s;

	-moz-transform: translateZ(30px) rotateY(30deg);
	-moz-transition-property: -moz-transform, box-shadow, margin;
	-moz-transition-duration: 0.5s;
}
#movieposters li:hover .movieinfo {
	-webkit-transform: rotateY(0deg);
	-moz-transform: rotateY(0deg);
	box-shadow: 0 5px 10px #888;
	margin: -175px 0 0 30px;
}

demodownload

查看更多:http://www.marcofolio.net/css/3d_animation_using_pure_css3.html

创建渐变文字

$
0
0

此效果仅限于webkit内核,先设置background-image为渐变的颜色,然后设置-webkit-background-clip为text,最后设置填充颜色为透明即-webkit-text-fill-color: transparent;

p{
	font-size:80px;
	background-image: -webkit-linear-gradient(top, rgba(0,0,0,0.65) 0%,rgba(0,0,0,0) 100%);
	-webkit-background-clip: text;
	-webkit-text-fill-color: transparent;
}

css3 download按钮设计

$
0
0
css3 download按钮设计

本实例主要应用gradient,然后使用box-shadow和border-raidus生成一个看起来很酷的按钮。然后download文字和版本文字分为两层,download文字层的z-index大于版本文字的z-index,鼠标滑过的时候改变download文字的宽度,露出下面的版本文字层。

demodownload

css主要代码:

#btn-wrap {                                                                             
	position:relative;                                                                  
	padding:5px;                                                                        
	margin:0 auto;                                                                      
	width:230px;                                                                        
	height:50px;                                                                        
	display:block;                                                                      
	text-decoration:none;                                                               
	margin-bottom:30px;                                                                 
	background: #242428;                                                                
    background: -webkit-gradient(linear, 0 bottom, 0 top, from(#2d2d30 ), to(#17171a)); 
    background: -moz-linear-gradient(-90deg, #17171a, #2d2d30 );                        
    -webkit-border-radius: 50px;                                                        
    -moz-border-radius: 50px;                                                           
    border-radius: 50px;                                                                
    -webkit-box-shadow: 0 1px 0 #37373b;                                                
    -moz-box-shadow: 0 1px 0 #37373b;                                                   
    box-shadow: 0 1px 0 #37373b;                                                        
}                                                                                       
                                                                                        
span.title{                                                                             
	color:#d6d6e7;                                                                      
	font:30px/58px "BebasNeueRegular", Helvetica, Arial, sans-serif;                    
	height:50px;                                                                        
	width:230px;                                                                        
	display:block;                                                                      
	position:relative;                                                                  
    -webkit-box-shadow: 0 -1px 0 #8d8d94, 0 1px 1px #0b0b0c;                            
    -moz-box-shadow:  0 -1px 0 #8d8d94, 0 1px 1px #0b0b0c;                              
    box-shadow:  0 -1px 0 #8d8d94, 0 1px 1px #0b0b0c;                                   
	background: #52525c;                                                                
    background: -webkit-gradient(linear, 0 bottom, 0 top, from(#383840 ), to(#5a5a64)); 
    background: -moz-linear-gradient(-90deg, #5a5a64, #383840 );                        
    -webkit-border-radius: 50px;                                                        
    -moz-border-radius: 50px;                                                           
    border-radius: 50px;                                                                
	z-index:5;                                                                          
	-webkit-transition:width .2s ease-out;                                              
	-moz-transition:width .2s ease-out;                                                 
	-o-transition:width .2s ease-out;                                                   
}                                                                                       
                                                                                        
#btn-wrap:hover span.title {                                                            
	font-size:19px;                                                                     
	width:135px;                                                                        
}                                                                                       
                                                                                        
#info {                                                                                 
	position:absolute;                                                                  
	height:50px;                                                                        
	width:230px;                                                                        
	top:5px;                                                                            
	right:4px;                                                                          
	-webkit-box-shadow: 0 -1px 0 #404042, 0 1px 1px #0b0b0c;                            
    -moz-box-shadow:   0 -1px 0 #404042, 0 1px 1px #0b0b0c;                             
    box-shadow:   0 -1px 0 #404042, 0 1px 1px #0b0b0c;                                  
	background: #2a2a2d;                                                                
    background: -webkit-gradient(linear, 0 bottom, 0 top, from(#212124 ), to(#2a2a2d)); 
    background: -moz-linear-gradient(-90deg, #2a2a2d, #212124 );                        
    -webkit-border-radius: 50px;                                                        
    -moz-border-radius: 50px;                                                           
    border-radius: 50px;                                                                
	z-index:4;                                                                          
}                                                                                       
                                                                                        
#info p {                                                                               
	width:65px;                                                                         
	margin:12px 17px 0 0;                                                               
	position:absolute;                                                                  
	right:0;                                                                            
	color:#7c7c84;                                                                      
	font:11px/12px Helvetica, Arial, sans-serif;                                        
	text-align:left;                                                                    
}                                                                                       
                                                                                        
.boxtuffs {                                                                             
	color: #7c7c84;                                                                     
	font:12px Helvetica, Arial, sans-serif;                                             
	text-shadow: 0  -1px 0 #000;                                                        
	text-decoration:none;                                                               
	-webkit-transition:all .2s ease-out;                                                
	-moz-transition:all .2s ease-out;                                                   
	-o-transition:all .2s ease-out;                                                     
}                                                                                       
                                                                                        
.boxtuffs:hover {                                                                       
	color: #27896a;                                                                     
}                                                                                       

demodownload


查看更多:http://boxtuffs.com/stuff/download-me/

css3 icon导航

$
0
0
css3 icon导航

本实例主要应用了border-radius,transition,font-face。先设置一个宽度并设置overflow为hidden,然后鼠标滑过用transition来改变其宽度,以显示文字信息部分。至于三个icon,前面两个为font-face做的,后面一个为图片。至于三个icon,前面两个为font-face做的,后面一个为图片。

demodownload

css主要代码:

.appstorebutton {
	height: 80px;
	width: 80px;
	margin: 50px;
	position: relative;
	overflow: hidden;
	float: left;

	-webkit-border-radius: 40px;
	   -moz-border-radius: 40px;
			border-radius: 40px;

	-webkit-transition: width 1s ease;
	   -moz-transition: width 1s ease;
		 -o-transition: width 1s ease;
		-ms-transition: width 1s ease;
			transition: width 1s ease;
}

.appstorebutton:hover {
	width: 275px;
}

.appstorebutton a {
	color: white;
	text-decoration: none;
}

/*Paragraph*/
.appstorebutton p {
	font: 30px/1 Helvetica, Arial, sans-serif;
	text-align: center;
	color: white;
	margin: 4px 0 0 65px;
	width: 180px;
}

.appstorebutton p small {
	font-size: 15px;
}

.iphone small:before {
	content: "O";
	position: absolute;
	font: 70px/1 'ModernPictogramsNormal', Helvetica, sans-serif;
	top: 10px;
	left: 20px;
}

.ipad small:before {
	content: "Q";
	position: absolute;
	font: 70px/1 'ModernPictogramsNormal', Helvetica, sans-serif;
	top: 10px;
	left: 13px;
}

.mac small:before {
	content: url(imac.png);
	position: absolute;
	top: 22px;
	left: 18px;
}


/*Button Colors*/
.iphone {
	background: #7b7a7f;
}

.ipad {
	background: #2ea9dc;
}

.mac {
	background: #dc2e2e;
}

/*Font-Face*/
@font-face {
	font-family: 'ModernPictogramsNormal';
	src: url('modernpics-webfont.eot');
	src: url('modernpics-webfont.eot?#iefix') format('embedded-opentype'),
		 url('modernpics-webfont.woff') format('woff'),
		 url('modernpics-webfont.ttf') format('truetype'),
		 url('modernpics-webfont.svg#ModernPictogramsNormal') format('svg');
	font-weight: normal;
	font-style: normal;
}

demodownload

查看更多:http://designshack.net/articles/css/appstorebuttons/


将css3 3D实体化

$
0
0

这两三天一直比较关注css3的3D特效,从最初的稀里糊涂,到现在大概摸进门路,不得不感谢张鑫旭的这篇神作:好吧,CSS3 3D transform变换,不过如此!

从这里搞清楚了一些概念,然后多方查找相关的实例,慢慢的也算入了门,但是论及实际应用那肯定还有一段很长的路需要走。在实践的过程中,总是要构建好一个虚拟的3D框架的,但是由于我的想象力不够丰富,再加上高中的立体几何全部还给老师了,所以这个对我来说比较是个难题。我相信很多人都应该是个难题,于是根据上面张老师的神作,虚拟构建体操运动员,钢管舞,飞刀特技,慢慢的也能进入角色。但是每次都要虚拟构建这三个东西也太繁琐了。于是重新拿起来了立体框架,如下图:

然则本人想象力确实有限,所以每次这样虚拟的倒还不如虚拟构建前面三个具体的来得实际。既然张老师可以虚拟中抽出实体来,为什么我不可以。

于是我想到了桌子,凳子什么的乱起八糟的,但最终落在了我敲键盘的手上,对,我用我的手指完全可以模拟出那个立体框架。

X轴对应中指,Y轴对应拇指,Z轴对应食指,三个手指各成90度,立体框架构建完毕。效果如图:

这样我们要做css3 3D效果的话直接用着三个指头就可以构建一个实体的框架了,清晰可见,模拟X轴旋转,Y轴旋转什么的也就比较直观了。

css3树形导航

$
0
0
css3树形导航

本实例主要是比较好看哈哈,然后使用了css3初级学习者一般不理解的:target这个伪元素,所以收纳。运用的css3有gradient生成渐变背景,:before生成前面的图标及二级菜单的箭头,:target来实现折叠效果,同时还应用了个transition来改变opacity的动画。当然这个案例其实左边的小图标还可以用font-face来制作,那样就更好了。

demodownload

css主要代码:

.menu {
	width: auto;
	height: auto;
	-webkit-box-shadow: 0px 1px 3px 0px rgba(0,0,0,.73), 0px 0px 18px 0px rgba(0,0,0,.13);
	-moz-box-shadow: 0px 1px 3px 0px rgba(0,0,0,.73), 0px 0px 18px 0px rgba(0,0,0,.13);
	box-shadow: 0px 1px 3px 0px rgba(0,0,0,.73), 0px 0px 18px 0px rgba(0,0,0,.13);
}
.menu > li > a {
	background-color: #616975;
	background-image: -webkit-gradient(linear, left top, left bottom, from(rgb(114, 122, 134)),to(rgb(80, 88, 100)));
	background-image: -webkit-linear-gradient(top, rgb(114, 122, 134), rgb(80, 88, 100));
	background-image: -moz-linear-gradient(top, rgb(114, 122, 134), rgb(80, 88, 100));
	background-image: -o-linear-gradient(top, rgb(114, 122, 134), rgb(80, 88, 100));
	background-image: -ms-linear-gradient(top, rgb(114, 122, 134), rgb(80, 88, 100));
	background-image: linear-gradient(top, rgb(114, 122, 134), rgb(80, 88, 100));
	filter: progid:DXImageTransform.Microsoft.gradient(GradientType=0,StartColorStr='#727a86', EndColorStr='#505864');
	border-bottom: 1px solid #33373d;
	-webkit-box-shadow: inset 0px 1px 0px 0px #878e98;
	-moz-box-shadow: inset 0px 1px 0px 0px #878e98;
	box-shadow: inset 0px 1px 0px 0px #878e98;
	width: 100%;
	height: 2.75em;
	line-height: 2.75em;
	text-indent: 2.75em;
	display: block;
	position: relative;
	font-family: "Helvetica Neue", Helvetica, Arial, sans-serif;
	font-weight: 600;
	color: #fff;
	text-shadow: 0px 1px 0px rgba(0,0,0,.5);
}
.menu ul li a {
	background: #fff;
	border-bottom: 1px solid #efeff0;
	width: 100%;
	height: 2.75em;
	line-height: 2.75em;
	text-indent: 2.75em;
	display: block;
	position: relative;
	font-family: "Helvetica Neue", Helvetica, Arial, sans-serif;
	font-size: 0.923em;
	font-weight: 400;
	color: #878d95;
}
.menu ul li:last-child a {
	border-bottom: 1px solid #33373d;
}
.menu > li > a:hover, 
.menu > li > a.active,
.menu > li:target > a  /*add this*/ {
	background-color: #35afe3;
	background-image: -webkit-gradient(linear, left top, left bottom, from(rgb(69, 199, 235)),to(rgb(38, 152, 219)));
	background-image: -webkit-linear-gradient(top, rgb(69, 199, 235), rgb(38, 152, 219));
	background-image: -moz-linear-gradient(top, rgb(69, 199, 235), rgb(38, 152, 219));
	background-image: -o-linear-gradient(top, rgb(69, 199, 235), rgb(38, 152, 219));
	background-image: -ms-linear-gradient(top, rgb(69, 199, 235), rgb(38, 152, 219));
	background-image: linear-gradient(top, rgb(69, 199, 235), rgb(38, 152, 219));
	filter: progid:DXImageTransform.Microsoft.gradient(GradientType=0,StartColorStr='#45c7eb', EndColorStr='#2698db');
	border-bottom: 1px solid #103c56;
	-webkit-box-shadow: inset 0px 1px 0px 0px #6ad2ef;
	-moz-box-shadow: inset 0px 1px 0px 0px #6ad2ef;
	box-shadow: inset 0px 1px 0px 0px #6ad2ef;
}
.menu > li > a.active {
	border-bottom: 1px solid #1a638f;
}
.menu > li > a:before {
	content: '';
	background-image: url(../images/sprite.png);
	background-repeat: no-repeat;
	font-size: 36px;
	height: 1em;
  	width: 1em;
	position: absolute;
  	left: 0;
	top: 50%;
	margin: -.5em 0 0 0;
}
.item1 > a:before {
	background-position: 0 0;
}
.item2 > a:before {
	background-position: -38px 0;
}
.item3 > a:before {
	background-position: 0 -38px;
}
.item4 > a:before {
	background-position: -38px -38px;
}
.item5 > a:before {
	background-position: -76px 0;
}
.menu > li > a span {
	font-size: 0.857em; 
	display: inline-block;
	position: absolute;
	right: 1em;
	top: 50%; 
	background: #48515c;
	line-height: 1em;
	height: 1em;
	padding: .4em .6em;
	margin: -.8em 0 0 0; 
	color: #fff;
	text-indent: 0;
	text-align: center;
	-webkit-border-radius: .769em;
	-moz-border-radius: .769em;
	border-radius: .769em;
	-webkit-box-shadow: inset 0px 1px 3px 0px rgba(0, 0, 0, .26), 0px 1px 0px 0px rgba(255, 255, 255, .15);
	-moz-box-shadow: inset 0px 1px 3px 0px rgba(0, 0, 0, .26), 0px 1px 0px 0px rgba(255, 255, 255, .15);
	box-shadow: inset 0px 1px 3px 0px rgba(0, 0, 0, .26), 0px 1px 0px 0px rgba(255, 255, 255, .15);
	text-shadow: 0px 1px 0px rgba(0,0,0,.5);
	font-weight: 500;
}
.menu > li > a:hover span, 
.menu > li a.active span,
.menu > li:target > a span /*add this*/ {
	background: #2173a1;
}
.menu > li > ul li a:before{
	content: '▶';
	font-size: 8px;
	color: #bcbcbf;
	position: absolute;
	width: 1em;
	height: 1em;
	top: 0;
	left: -2.7em;
}

.menu > li > ul li:hover a,
.menu > li > ul li:hover a span,
.menu > li > ul li:hover a:before {
	color: #32373D;
}


.menu ul > li > a span {
	font-size: 0.857em; 
	display: inline-block;
	position: absolute;
	right: 1em;
	top: 50%; /
	background: #fff;
	border: 1px solid #d0d0d3;
	line-height: 1em;
	height: 1em;
	padding: .4em .7em;
	margin: -.9em 0 0 0; 
	color: #878d95;
	text-indent: 0;
	text-align: center;
	-webkit-border-radius: .769em;
	-moz-border-radius: 769em;
	border-radius: 769em;
	text-shadow: 0px 0px 0px rgba(255,255,255,.01));
}

/*additional*/

.menu > li > ul {
	height: 0;
	overflow: hidden;
	
	opacity: 0; 
  	filter: alpha(opacity=0); /* IE6-IE8 */
	
	-webkit-transition: opacity 0.9s ease-in-out;
	-moz-transition: opacity 0.9s ease-in-out;
	-o-transition: opacity 0.9s ease-in-out;
	-ms-transition: opacity 0.9s ease-in-out;
	transition: opacity 0.9s ease-in-out;
}

.menu > li:target > ul {
    height: auto; /*using auto nullifies the height transitions, but it makes things flexible which is more important*/
    border-bottom: 1px solid #51555a;
    
	opacity: 1; 
  	filter: alpha(opacity=100); /* IE6-IE8 */
}

demodownload

查看更多:http://webdesign.tutsplus.com/tutorials/htmlcss-tutorials/quick-tip-give-ormans-navigation-the-target-treatment/?search_index=55

css3 3D旋转正方体

$
0
0
css3 3D旋转正方体

再来一个3D的案例,本实例自谷歌,技术自然不用说了,那是一级棒。个人能力有限,我就挑简单的分析下呵呵。说下这个正方体的实现吧,先设置父级元素的transform-style:preserve-3d,然后定义各个面的宽高及绝对定位并设置scale3D为1.2倍,最后就是把各个面分别运用rotateX,rotateY,再运用translateZ拉开距离。至于旋转的运动则是设置父元素的animation从0到360deg的旋转。既然是google的案例,那肯定不支持火狐啊,不过只要换个前缀火狐也不是问题吧。

demodownload

css3主要代码:

 #container {
      width: 100%;
      height: 700px;
      -webkit-perspective: 800; /* For compatibility with iPhone 3.0, we leave off the units here */
      -webkit-perspective-origin: 50% 225px;
    }
    #stage {
      width: 100%;
      height: 100%;
      -webkit-transition: -webkit-transform 2s;
      -webkit-transform-style: preserve-3d;
    }
    
    #shape {
      position: relative;
      top: 160px;
      margin: 0 auto;
      height: 200px;
      width: 200px;
      -webkit-transform-style: preserve-3d;
    }
    
    .plane {
      position: absolute;
	  left:0;
	  top:0;
      height: 200px;
      width: 200px;
      border: 1px solid white;
      -webkit-border-radius: 12px;
      -webkit-box-sizing: border-box;
      text-align: center;
      font-family: Times, serif;
      font-size: 124pt;
      color: black;
      background-color: rgba(255, 255, 255, 0.6);
      -webkit-transition: -webkit-transform 2s, opacity 2s;
      -webkit-backface-visibility: hidden;
    }

    #shape.backfaces .plane {
      -webkit-backface-visibility: visible;
    }
    
    #shape {
      -webkit-animation: spin 8s infinite linear;
    }

    @-webkit-keyframes spin {
      from { -webkit-transform: rotateY(0); }
      to   { -webkit-transform: rotateY(-360deg); }
    }

    /* ---------- cube styles ------------- */
    .cube > .one {
      opacity: 0.5;
      -webkit-transform: scale3d(1.2, 1.2, 1.2) rotateX(90deg) translateZ(100px);
    }

    .cube > .two {
      opacity: 0.5;
      -webkit-transform: scale3d(1.2, 1.2, 1.2) translateZ(100px);
    }

    .cube > .three {
      opacity: 0.5;
      -webkit-transform: scale3d(1.2, 1.2, 1.2) rotateY(90deg) translateZ(100px);
    }

    .cube > .four {
      opacity: 0.5;
      -webkit-transform: scale3d(1.2, 1.2, 1.2) rotateY(180deg) translateZ(100px);
    }

    .cube > .five {
      opacity: 0.5;
      -webkit-transform: scale3d(1.2, 1.2, 1.2) rotateY(-90deg) translateZ(100px);
    }

    .cube > .six {
      opacity: 0.5;
      -webkit-transform: scale3d(1.2, 1.2, 1.2) rotateX(-90deg) translateZ(100px) rotate(180deg);
    }

demodownload

查看更多:http://www.webkit.org/blog-files/3d-transforms/poster-circle.html

CSS美化图片

$
0
0

很久没有写blog了,不知道是时间太紧的原故还是人懒惰了。今天在webdesignerwall.com看到一篇不错的文章《CSS Decorative Gallery》,文章中介绍了多种不同的方法,用于美化Web页面中的IMG。学得很有意思,其实早在《CSS3制作图片样式》和《jQuery和CSS3给图片制作圆角》中有介绍过怎么美化img,但是今天这篇文章更有意思。我们不仿一起来看看:

如果你阅读了webdesignerwall.com写的文字渐变一文,理解后面的内容就很简单。因为后面的DEMO都采用了同样的原理。这原理很简单就是给元素添加一个额外的标签,比如说<span>,将背景图片放在这个标签上,然后将其当作图片的朦板,遮盖在图片上。这样制作给你带来极大的灵活性,可维护性。当然,如果你不需要兼容IE低版本的话,我们不用增加任何标签也可以制作,就是使用CSS3选择器中的伪类(:before和:after)或者伪元素(::before和::after),同时把放在span标签上的背景图片放在伪元素或伪类上。这是一种新的思路,不过此文并没有运用,我还是按照原作者的思路与大家一起学习其制作方法。

制作原理:

其实原理前面就多了,在此重复一下:添加一个额外标签,充当图片的朦板,然后将图片边框之类背景放在这个标签上。当然在CSS3中,可以不添加标签,直接使用伪类或伪元素来实现。

demodownload

技巧的好处是什么?

大家会问,这样做能给我们带来什么好处呢?其实好处还是蛮多的:

  1. 节约时间:你不用为每种效果制作图片,然后将图片导出来;
  2. 保持原图片不变:使用这种方法,无需为了不同的效果去改为源图片;
  3. 适应多主题:这种技巧最大的好处就是,我们可以随时根据需要,使用css就能制作出不同的主题效果;
  4. 能工作在任何网站上:这种技巧不受限于网站的类型,而且图片大小不限;
  5. 兼容各浏览器:具有较强的兼容性,连IE6这样的低版本都能兼容。

基本结构:

结构是很简单,如:

<div class="photo">
  <a href="">
    <span></span>
      <img src="xxx.jpg" alt="" />
    </a>
  </div>

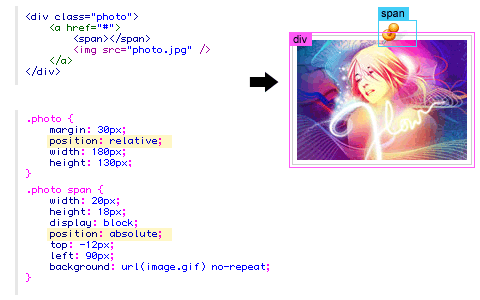
上面的结构我想大家都懂的,不过我还是在多说一下,我们把图片放在一个“div.photo”中,正如前面所说,在这里面添加了一个“span”标签(当然你可以是其他的标签),这个标签主要是充当图片的朦板效果,将图片的边框图片之类放在这个“span”中(以背景图片方式展示)。当然你如果不想添加这个“span”也行,你可以使用“:before”和“::before”之类,只不过这种方法只能在现代浏览器下运行。或者说,你可以使用js来插入这个“span”标签,正如前面的《CSS3制作图片样式》和《jQuery和CSS3给图片制作圆角》所介绍的一样。

朦板图片有着落放置了,接下来就是使用样式,我们这个“span”标签进行绝对定位,并且让其遮盖在原图上,其工作方式,我们以下图来进说简单明了的说明:

IE6下的PNG问题

由于我们的朦板图片采用的格式是PNG24(或者PNG32)的透明图片,这样在IE6下会有一个透明层的BUG,为了解决这个BUG,可以使用iepngfix.htc。使用iepngfix.htc并不复杂,你只需要把“iepngfix.htc”下载到你的项目中,然后在你项目文件的“<head>”中插入以下代码:

<!--[if lt IE 7]>
  <style type="text/css">
    .photo span { behavior: url(iepngfix.htc); }
  </style>
<![endif]-->

除了使用这种方法之外,你也可以使用DD_png的方法(js脚本处理方法)来解决PNG透明问题,详细的您可以参阅《解决IE6的png透明问题》一文。

效果预览:

说了这么多,那真的是不是那么神奇有用呢?我们在具体每个demo化之前,先来看一个DEMO效果:

jQuery插入标签:

对于有代码洁癖的同学来说,他不能容忍在HTML有任何空标签,那么此时,我们要满足这些同学的要求,只好借助JQ来实现:

<script type="text/javascript" src="jquery.js"></script>
<script type="text/javascript">
  $(document).ready(function(){						   
    //动态插入图片朦板空标签span
    $(".photo a").prepend("<span></span>");								  
  });
</script>

DEMO分析

理论上的东西我想大家应该了解的差不多了,接下来,我们来看webdesignerwall.com制作的几个DEMO,这里我分别将其代码扣出,放上来与大家分享,希望对大家有所帮助:

在具体DEMO前,先将其结构放上来,由于我们DEMO中不只一张图片,所以将前面示例的结构换成了列表的形式,后面的DEMO中如无特殊声明,都以下面的结构为基础:

<ul class="gallery">
  <li><a href="#"><span></span><img src="images/11.jpg" alt="image" /></a></li>
  <li><a href="#"><span></span><img src="images/14.jpg" alt="image" /></a></li>
  <li><a href="#"><span></span><img src="images/4.jpg" alt="image" /></a></li>
  <li><a href="#"><span></span><img src="images/7.jpg" alt="image" /></a></li>
  <li><a href="#"><span></span><img src="images/5.jpg" alt="image" /></a></li>
  <li><a href="#"><span></span><img src="images/6.jpg" alt="image" /></a></li>
  <li><a href="#"><span></span><img src="images/3.jpg" alt="image" /></a></li>
  <li><a href="#"><span></span><img src="images/1.jpg" alt="image" /></a></li>
</ul>

注:每个DEMO会有细微上的差别,请以相对应的DEMO源文件为标准。

1、Simple Gallery

第一个DEMO是比较简单,我们在span上使用一张(类似于胶带的背景图)“tape.png”,将图片制作成类似于粘贴在墙上的效果:

CSS Code

/*清除浮动*/
.gallery:after,
.gallery:before {
	display: table;
	content:"";
}
.gallery:after {
	clear:both;
	overflow: hidden;
}
.gallery {
	list-style: none;
	margin: 0;
	padding: 0;
	zoom:1;
}
.gallery li {
	margin: 10px;
	padding: 0;
	float: left;
	position: relative;
	width: 180px;
	height: 130px;
}
.gallery img {
	background: #fff;
	border: solid 1px #ccc;
	padding: 4px;
}
/*图片朦板效果*/
.gallery span {
	width: 77px;
	height: 27px;
	display: block;
	position: absolute;
	top: -12px;
	left: 50px;
	background: url(images/tape.png) no-repeat;
}
.gallery a {
	text-decoration: none;
}

大家在实际运用中可以根据自己需要进行相对应的调整。这里说一下,其实“tap.png”的效果,如果在CSS3中的话,大家可以直接使用CSS3代码制作实现,如果你有兴趣了解如何制作?可以移步这里!

2、Mini Icons

这个效果和DEMO一是很相似的,只是将span的背景图片换成了小的icon,同时鼠标移到图片上后,ICON也会做一定的变化,这种效果可以说,很多地方可见:

CSS代码

.gallery:after,
.gallery:before {
	display: table;
	content:"";
}
.gallery:after {
	clear:both;
	overflow: hidden;
}
.gallery {
	list-style: none;
	margin: 0;
	padding: 0;
	zoom:1;
}
.gallery li {
	margin: 10px;
	padding: 0;
	float: left;
	position: relative;
	width: 180px;
	height: 130px;
}
.gallery img {
	background: #fff;
	border: solid 1px #ccc;
	padding: 4px;
}
/*ICON容器大小与定位*/
.gallery span {
	width: 20px;
	height: 18px;
	display: block;
	position: absolute;
	bottom: 10px;
	right: 10px;
}
/*不同类型运用不同的ICON背景图片*/
.gallery .favorite {
	background: url(images/favorite.gif) no-repeat;
}
.gallery .photo {
	background: url(images/photo.gif) no-repeat;
}
.gallery .video {
	background: url(images/video.gif) no-repeat;
}
.gallery a {
	text-decoration: none;
}
.gallery a:hover img  {
	border-color: #666;
}
.gallery a:hover span {
	background-position: left -22px;
}

注:与DEMO一相比,需要在对应的a标签上添加类名,详细以DEMO源文件为标准。

3、Photo With Text

DEMO3与前两上相比,从结构上来说,把“span”标签更换成“em”标签,其实不用更换也能做出下面的效果,另外还在“em”标签中添加了图片对应的标签,并且在这个“em”上制作了一种带有纹理的背景,如下所示:

.gallery:after,
.gallery:before {
	display: table;
	content:"";
}
.gallery:after {
	clear:both;
	overflow: hidden;
}
.gallery {
	list-style: none;
	margin: 0;
	padding: 0;
	zoom:1;
}
.gallery li {
	padding: 10px;
	margin: 0;
	float: left;
	position: relative;
	width: 180px;
	height: 130px;
}
.gallery li:hover img {
	border-color: #000;
}
.gallery img {
	background: #fff;
	border: solid 1px #888;
	padding: 5px;
}
/*朦板效果*/
.gallery em {
	background: #fff url(images/grey-gradient.gif) repeat-y;
	color: #000;
	font-style: normal;
	padding: 2px 10px;
	display: block;
	position: absolute;
	top: 110px;
	left: 9px;
	border: 1px solid #999;
	border-left-color: #888;
}
.gallery a {
	text-decoration: none;
}
.gallery a:hover em {
	background: #ffdb01 url(images/orange-gradient.gif) repeat-y;
	border-color: #c25b08;
}

4、Popup Text

这个效果大家也有看到过,就是鼠标移到图片上,有一个简单的提示说明文字,如下所示:

CSS 代码:

.gallery:after,
.gallery:before {
	display: table;
	content:"";
}
.gallery:after {
	clear:both;
	overflow: hidden;
}
.gallery {
	list-style: none;
	margin: 0;
	padding: 0;
	zoom:1;
}
.gallery li {
	padding: 10px;
	margin: 0;
	float: left;
	position: relative;
	width: 180px;
	height: 130px;
}
.gallery img {
	background: #fff;
	border: solid 1px #ccc;
	padding: 5px;
}
.gallery li:hover img {
	border-color: #999;
}
/*朦板效果,并且默认时隐藏*/
.gallery em {
	width: 102px;
	background: url(images/bubble.gif) no-repeat;
	padding: 3px 0 6px;
	display: none;
	position: absolute;
	top: -2px;
	left: 50px;
	font-style: normal;
	text-align: center;
}
.gallery a {
	text-decoration: none;
	color: #000;
}
/*鼠标悬浮时,朦板显示*/
.gallery a:hover em {
	display: block;
}

5、Mini Paper Clip

使用一个别针一样的背景图片,制作出图片别在另一个纸张上的效果,与前面demo不同之处,添加了两个标签,其中span上放别针背景,em放描述文字:

CSS代码

.gallery:after,
.gallery:before {
	display: table;
	content:"";
}
.gallery:after {
	clear:both;
	overflow: hidden;
}
.gallery {
	list-style: none;
	margin: 0;
	padding: 0;
	zoom:1;
}
.gallery li {
	padding: 10px;
	margin: 0;
	float: left;
	position: relative;
	width: 180px;
	height: 130px;
}
.gallery li:hover img {
	border-color: #000;
}
.gallery img {
	background: #fff;
	border: solid 1px #ccc;
	padding: 5px;
}
/*描述文字定位*/
.gallery em {
	background: #fff;
	color: #000;
	font-style: normal;
	padding: 2px 8px 0 22px;
	display: block;
	position: absolute;
	top: 20px;
	left: 5px;
	border: 1px solid #999;
}
.gallery a {
	text-decoration: none;
}
/*别针朦板效果*/
.gallery span {
	width: 30px;
	height: 60px;
	display: block;
	position: absolute;
	top: 7px;
	left: 9px;
	background: url(images/paper-clip-mini.png) no-repeat;
	z-index: 3;
}

6、Art Gallery

使用不较大的朦板背景图片,可以给图片添加一些艺术边框效果,如:

CSS 代码

.gallery:after,
.gallery:before {
	display: table;
	content:"";
}
.gallery:after {
	clear:both;
	overflow: hidden;
}
.gallery {
	list-style: none;
	margin: 0;
	padding: 0;
	zoom:1;
}
.gallery li {
	margin: 20px;
	padding: 0;
	float: left;
	position: relative;
	width: 212px;
	height: 175px;
}

.gallery a {
	text-decoration: none;
	color: #666;
}
.gallery a:hover {
	color: #000;
	text-decoration: underline;
}
.gallery img {
	padding: 20px 0 0 21px;
}
/*艺术相框效果*/
.gallery em {
	width: 216px;
	background: url(images/gold-frame.png) no-repeat;
	display: block;
	position: absolute;
	top: -2px;
	left: -2px;
	text-align: center;
	font: 100%/100% Georgia, "Times New Roman", Times, serif;
	padding-top: 168px;
}

使用不同的边框效果,我们可以制作出不一样的DEMO,只要你有创意,什么效果都可以制作出来,为了节省你的时间,我就不全部列出来了,如果你喜欢其他的效果,你就拼命点这里

上面方法采用的是列表形式,可能在您布局之时会碰到同一行末尾的margin-right问题,说得简单点就是末位会掉下去,这里我没有做过多处理,如果你想完美点,可以参考《如何避免重复列末尾的Margin》一文,或者参阅为之为大家总结的《CSS解决方案》中的《项目列表解决方案》。

有关于CSS美化图片就介绍到这里了,这里只是给大家提供一个思路,您可以发挥你的创意,和无限的想像力,制作出各式各样的,具有创意的效果。

特别声明,本文中的图片和代码均来自于webdesignerwall.com的《CSS Decorative Gallery》一文。

demodownload

如需转载,烦请注明出处:http://www.w3cplus.com/css/css-decorative-gallery.html

CSS3美化图片

$
0
0

有关于美化图片的教程,W3cplus有好几篇了,比如说《CSS3制作图片样式》、《jQuery和CSS3给图片制作圆角》这两篇是针对于美化图片圆角效果的教程,昨天在《CSS美化图片》一文中介了使用标签给图片设置朦板效果。

CSS美化图片》制作原理是通过给元素添加一个额外的标签,比如说“span”标签,或者能过jQuery的append函数给元素添加标签,在把将此标签运用朦板背景图片定位在图片元素之上,达到美化图片的效果。今天要和大家分享一种新的方法,基于《CSS美化图片》介绍的理论之上,把里面的“span”标签去掉,同时使用CSS3中的伪元素“::before”和“::after”或者CSS3的伪类选择器“:before”和“:after”来代替增加的标签“span”,接着将运用在span上的样式转架嫁到伪元素或者伪类选择器上。下面我们一起来学习一下这种制作方法与CSS方法有何不一样?

demodownload

HTML结构的变化

首先来简单的回忆一下《CSS美化图片》介绍的结构,如图所示:

那么今天要介绍的方法,关键之处是不需要这个额外增加的“span”标准,此时结构就改成了:

<div class="photo">
  <a href="">
    <img src="xxx.jpg" alt="" />
  </a>
</div>

“span”标签去掉了,为了有空间或者说有位置来放置IMG需要的朦板图片,就需要另选择其它方法,也就是今天要为大家介绍的方法使用CSS3的“::before”、“::after”或者“:before”、“:after”(这两者只是称呼不一样,但所起的效果是一样的,详细的大家可以参阅《CSS3 选择器——伪类选择器》和red-team-design.com介绍的《The :before and :after pseudo-elements syntax》)。空间位置,我们找到了,接下来就是怎么实现,样式实现和前面介绍的方法是类似的,只不过将span标签上的样式置外为“a::before”,在这里同样有两个关键之处,第一在元素a标签定义“position:relative”,第二将IMG的朦板背景放置在“a::before”上,并且对其时行绝对定位,如下图所示:

实现原理我想大家都清楚了,如果你还不太清楚,也不用担心,接下来,我们跟着webdesignerwall.com的《Decorative CSS Gallery - Part2》中的实例在学习一回。

1、PAPER CLIP

别针列表效果,结构基本上和前面原理介绍的一样,只不过的了一种方式:

<ul class="gallery clip">
  <li><a href="#"><img src="sample-1.jpg" alt="image"></a></li>
  ...
  <li><a href="#"><img src="sample-6.jpg" alt="image"></a></li>
</ul>

由于不是一张图片,这里采用了列表形式代替当初的div,具体样式如下:

/* based gallery style */
.gallery {
	margin: 0 0 25px;
	text-align: center;
}
.gallery li {
	margin: 5px;
	list-style: none;
	display: inline-block;
}
.gallery a {
	position: relative;/*这个很关键*/
	display: inline-block;
}

/* paper clip style */
.clip img {
	padding: 4px;
	border: solid 1px #bbb;
	background: #fff;
	box-shadow: 0 1px 2px rgba(0,0,0,.2);
}
/*图片朦板的制作*/
.clip a:before {
	position: absolute;
	content: ' ';
	top: -5px;
	left: -4px;
	width: 30px;
	height: 60px;
	background: url(paper-clip.png) no-repeat;
}

这个例子中主要通过“a::before”创建了一个30px * 60px的容器,并且将别针背景图片(paper-clip.png)放在这里,并且定位到图片上面。在使用“::before”之类时,一定要配合“content”一起使用,不然这个容器将不存在。详细如下所示:

.clip a:before {
	position: absolute;
	content: ' ';
	top: -5px;
	left: -4px;
	width: 30px;
	height: 60px;
	background: url(paper-clip.png) no-repeat;
}

最终效果如下图所示:

2、ART FRAME

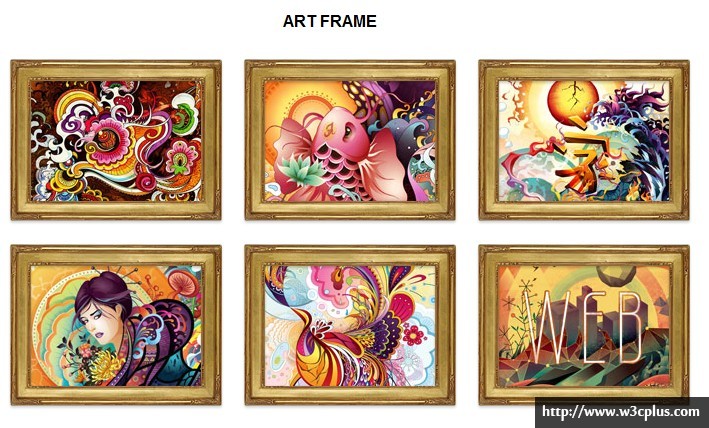
可以使用这个技巧给IMG添加任何朦板效果,并助放置任何位置,DEMO一中,制作的是左上角别针的效果,在这个实例中,给其制作一个艺术边框效果。在DEMO一的基础上,我们只将“a::before”的背景图片做一定的调整,并把样式做一点点对应的修整:

/* frame clip style */
.frame li {
	margin: 30px;
}
.frame a:before {
	position: absolute;
	content: ' ';
	top: -22px;
	left: -23px;
	width: 216px;
	height: 166px;
	background: url(frame.png) no-repeat;
}

最终效果如下所示:

3、TAPE

有时,我们实际需要的效果并不只前面两个案例的那样,比如说图片底下带有一定的简短标题或描述之类的,这时候前面的结构就无法满足需求,因此我们需要对结构做一定的调整。在这里使用一个HTML5的模板,正如下面的例子,用了一个<figure>标签包裹图片和图片标题(图片标题使用<figcaption>),如下所示:

<ul class="gallery tape">
  <li>
    <figure><a href="#"><img src="sample-4.jpg" alt="image"></a>
      <figcaption>Tony</figcaption>
    </figure>
  </li>
  ...
  <li>
    <figure><a href="#"><img src="sample-4.jpg" alt="image"></a>
      <figcaption>Tony</figcaption>
    </figure>
  </li>	
</ul>

结构完成后,给IMG添加样式,这个实例和前面的有所不同,图片上有一个胶带效果,并且还给IMG添加了一个半透明的朦板效果,而且他们分为两张图片在使用,那么一个“:beofer”就无法满足这个案例放置背景图片的需求。这个时候就运用了两个“:before”:一个用在了标签“<figure>”,而另一个仍旧运用在"<a>"标签上。将"overlay.pn"朦板图片运用在“figure:before”上,同时将tape图片运用在“a:beofor”上,如图所示:

样式代码如下所示

/* tape style */
.tape li {
	width: 170px;
	padding: 5px;
	margin: 15px 10px;
	border: solid 1px #cac09f;
	background: #fdf8e4;
	text-align: center;

	box-shadow: inset 0 1px rgba(255,255,255,.8), 0 1px 2px rgba(0,0,0,.2);
}
.tape figure {
	position: relative;
	margin: 0;
}
.tape figure:before {
	position: absolute;
	content: ' ';
	top: 0;
	left: 0;
	width: 100%;
	height: 100%;
	background: url(overlay.png) no-repeat;
}
.tape figcaption {
	font: 100%/120% Handlee, Arial, Helvetica, sans-serif;
	color: #787568;
}
.tape a:before {
	position: absolute;
	z-index: 2;
	content: ' ';
	top: -12px;
	left: 50%;
	width: 115px;
	height: 32px;
	margin-left: -57px;
	background: url(tape.png) no-repeat;
}

效果如图所示:

其实,我们也不用将“:before”分开运用在两个元素上面,大家别忘了,还有一个“:after”,所以可以直接将“a:after”来代替“figuer:before”。

4、图片墙

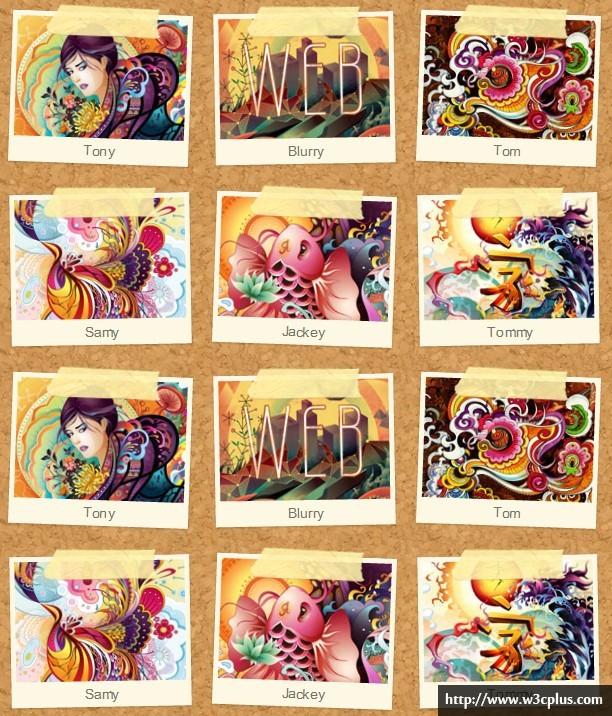
在DEMO三的基础上,在父元素上添加一个纹理,并元素添加一个旋转效果,我们就可以制作出一个图片墙效果:

/* transform */
.transform {
	background: url(cork-bg.png);
	padding: 25px;
	border-radius: 10px;

	box-shadow: inset 0 1px 5px rgba(0,0,0,.4);
}
.transform li {
	border: none;
}

图片墙效果,我们不想让图片千篇一律的,整齐旋转,此时可以运用CSS3选择器中的“:nth-of-type”来实现,在一定规律下进行相同的角度旋转,如图所示:

具体的代码如下所示:

.transform li:nth-of-type(4n+1) {
	-webkit-transform: rotate(2deg);
	-moz-transform: rotate(2deg);
	-ms-transform: rotate(2deg);
	transform: rotate(2deg);
}
.transform li:nth-of-type(2n) {
	-webkit-transform: rotate(-1deg);
	-moz-transform: rotate(-1deg);
	-ms-transform: rotate(-1deg);
	transform: rotate(-1deg);
}
.transform li:nth-of-type(4n+3) {
	-webkit-transform: rotate(2deg);
	-moz-transform: rotate(2deg);
	-ms-transform: rotate(2deg);
	transform: rotate(2deg);
}

旋转后就得到了我们需要的图片墙效果,如下所示:

当然大家还可以使用别的旋转规律,大家不仿参阅一下《CSS3制作留言墙》。

那么有关于CSS3美化图片就介绍到这里,在这里最后给大家总结一下:“主要使用伪类元素(::before和::after)或者伪类选择器(:before和:after)放置图片的朦板背景图片,并进行绝对定位到图片上面”。原理很简单,但在制作这个效果时运用到了不少的CSS3属性,比如说CSS3 选择器——伪类选择器CSS3 Transform等,如果你对这些属性还不太清楚,建议你仔细阅读CSS3属性教程与案例分享一文。

特别声明,上面所有DEMO的代码和图片来自于webdesignerwall.comDecorative CSS Gallery - Part2,如需转载请注明相关出处。

大家可以点相关的DEMO或者下载源码仔细研究:

demodownload

如需转载,烦清注明出处:http://www.w3cplus.com/css3/css3-decorative-gallery.html

Viewing all 1557 articles
Browse latest View live