Quantcast
Channel: w3cplus
Viewing all 1557 articles
Browse latest View live

Web布局连载——两栏固定布局(四)

$
0
0
  1. Web布局连载——两栏固定布局(一)
  2. Web布局连载——两栏固定布局(二)
  3. Web布局连载——两栏固定布局(三)

上一篇《Web布局连载——两栏固定布局(三)》主要介绍了使用负margin配合float实现固定两栏布局(侧栏居左,主内容居右)的四种不同的实现方法。今天接着介绍使用负margin和float实现固定两栏布局,只不过今天的两栏布局是侧栏居右,主内容居左。实现这种布局的结构和原理都和《Web布局连载——两栏固定布局(三)》一样,只是布局样式略有差别,说简单点就是使用不同的浮动方向与负margin,把侧栏由左放到右,主内容由右放到左。首页我们一起来看看今天要实现的布局效果,如下图所示:

边栏在右,主内容在左

刚才也说了,结构和前面介绍的《Web布局连载——两栏固定布局(三)》布局采用一样的结构,大致如下:

<div id="header">
    <div class="container">
       <h1>Header content</h1>
       <p>W3cplus Layout Template ➽ Fixed Width Layout ➽ Two Columns Layout </p>
    </div>
</div>
<div id="page">
    <div class="container">
        <div class="main-wrap">
            <div class="main-content">
                <h2>Main Content</h2>
            </div>
        </div>
        <div class="aside sidebar">
            <h2>Sidebar Content</h2>
        </div>
    </div>
</div>
<div id="footer">
    <div class="container">
        <h2>Footer Content</h2>
    </div>
</div>

同样实现上图的布局效果,我们也有多种方法,依旧向大家介绍四种不同的样式实现方法。

方法一:

先来看方法一,实现布局的演示过程图,这张图虽然静态,但有助于大家更好的理解这种布局方式的原理:

布局演示图

CSS代码

* {
  margin: 0;
  padding: 0;
}
body {
  font-family: 'Amarante', cursive;
  background: url(http://www.w3cplus.com/sites/default/files/bg_body.png) repeat;
  text-align: center; /*IE6下让元素居中*/
}

/*===================================================*\
 *                                                   *
 *   Layout                                          *
 *  .container宽度=.sidebar宽度+间距+.main-content宽度 *
 *                                                   *
\*===================================================*/
/*清除浮动*/
.container:after,
.container:before {
  content: "";
  display: table;
}

.container:after {
  clear: both;
  overflow: hidden;
}

.container {
  width: 960px; /*页面总宽度*/
  margin: 0 auto; /*水平居中*/
  text-align: left; /*重置文本对齐方式*/
  zoom: 1;
}

#header {
  background: #b1b1b1; /*header全屏背景色设置*/
  color: #fff;
  margin-bottom: 15px; /*顶部与主内容垂直间距,可自行修改*/
}
.main-wrap {
  float: left;
  width: 100%;
}
.main-content {
  margin-right: 240px;/*sidebar width + margin-right*/
}

.sidebar {
  width: 220px; /*侧栏宽度,可自行修改*/
  float: left;
  margin-left: -220px;/*侧栏的宽度*/
  display: inline;/*清除IE6下又边距*/
  zoom: 1;
  position: relative;
}


#footer {
  background: #b1b1b1; /*footer全屏背景色设置*/
  color: #fff;
}

/*测试样式,可自行修改*/
  #header .container {
  height: 75px;
}

.sidebar {
  height: 350px;
  background-color: #E7DBD5;
  box-shadow: 0 1px 2px 1px rgba(0, 0, 0, 0.2);
}

.main-content {
  background-color: #F2F2E6;
  height: 350px;
  box-shadow: 0 1px 2px 1px rgba(0, 0, 0, 0.2);
}

#footer .container {
  margin-top: 15px;
}

完成后的效果如下面的DEMO所示:

边栏在右,主内容在左

元素参数表格:

参数照表

方法二

这种方法结构不变,只是将相关样式参数做一定的调整,同样我们先来看一个布局演变的示意图:

布局演示图

修改后的布局样式代码:

.main-wrap {
  float: right;
  width: 100%;
}
.main-content {
  margin-right: 240px;/*sidebar width + margin-right*/
}

.sidebar {
  width: 220px; /*侧栏宽度,可自行修改*/
  float: right;
  margin-right: -960px;/*容器的宽度*/
  *margin-left:740px;/*兼容ie6-7*/
  display: inline;/*清除IE6下又边距*/
  zoom: 1;
  position: relative;
}

这种方法并不完美,在IE6-7之下需要使用一个hack ,设置一个“margin-left”值,这个值刚好等于主内容宽度加上间距。只有这样,这个布局样式才能兼容所有浏览器,最后效果如下DEMO所示

边栏在右,主内容在左

对应布局参数表:

参数照表

方法三

第三种方法和前两种方法的结构依然一样,我们一起来看看相关的参数变化。

布局演示图

对应的样式代码:

.main-wrap {
  float: left;
  width: 100%;
  margin-left: -240px;/*侧边栏宽度+间距*/
}
.main-content {
  margin-left: 240px;/*侧边栏宽度+间距*/
}
.sidebar {
  width: 220px; /*侧栏宽度,可自行修改*/
  float: right;
  display: inline;/*清除IE6下又边距*/
  zoom: 1;
  position: relative;
}

效果:

边栏在右,主内容在左

对应布局参数表:

参数照表

方法四

第四种方法,结构上稍作调整,去掉了内容的外容器“div.main-wrap”,其他的不变,

<div id="header">
    <div class="container">
        <div class="header">
            <h1>Header content</h1>
            <p>W3cplus Layout Template ➽ Fixed Width Layout ➽ Two Columns Layout </p>
        </div>
    </div>
</div>
<div id="page">
    <div class="container">
        <div class="main-content">
            <h2>Main Content</h2>
        </div>
        <div class="aside sidebar">
            <h2>Sidebar Content</h2>
        </div>
    </div>
</div>
<div id="footer">
    <div class="container">
        <h2>Footer Content</h2>
    </div>
</div>

演变示意图:
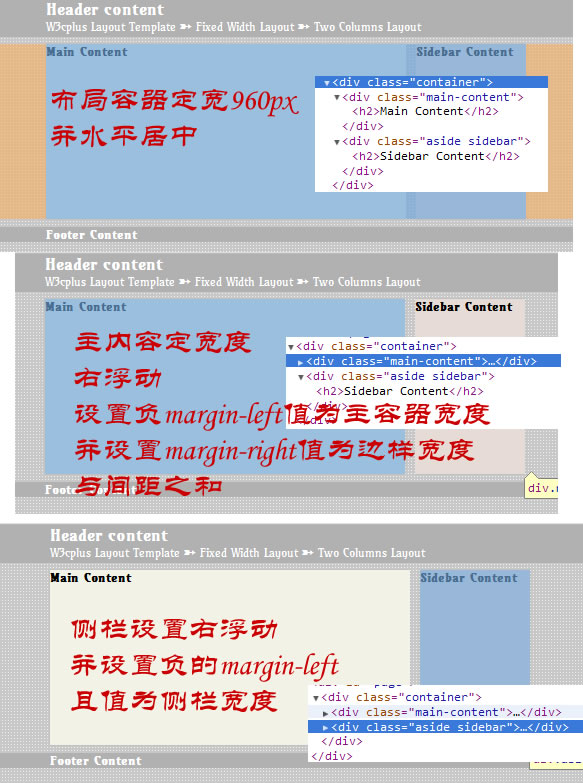
布局演示图

对应的样式代码:

.main-content {
  float: right;
  width: 720px;/*主内容宽度*/
  display: inline;/*清除IE6下双边距Bug*/
  margin-left: -960px;/*主容器总宽度*/
  margin-right: 240px;/*边栏宽度和间距*/
  position: relative;
  zoom: 1;
}
.sidebar {
  width: 220px; /*左边栏宽度,可自行修改*/
  float: right; /*右浮动*/
  margin-left: -220px;/*边栏宽度*/
  display: inline;
  position: relative;
}

效果:

边栏在右,主内容在左

对应布局参数表:

参数照表

大家也知道,今天介绍的布局方法和《Web布局连载——两栏固定布局(三)》是一样的,只是改变了一个侧栏的方向,大家都知道,侧栏是不固定的。昨天也有同学问我这样的布局有什么好处,具本我说一下我自己的看法:

  1. 首先加载了主内容,在加载侧栏,方便主次之分(也有同学说这样有利于SEO,自己不懂没有考证过)
  2. 不使用这个方法同样能实现先加载主内容,在加载次内容。是这样的,不过当你的布局有三栏时,这样的布局方法就会显得特别的方便(后期将会介绍的三栏布局效果)
  3. 负margin布局可以随时根据你的设计需求,调整布局风格。

有关于两栏布局,到今天为止我们一起学习了四节教程,里面涉及的方法多种多样,但总是离开不浮动。有很多同学很讨厌浮动的布局,因为害怕浮动。那么下一节同样介绍固定两栏布局,不过这种方法会比较特别。“No div, no float, no clear, no hack”,听起来好像是开玩笑一样,不过事实是有这样的方法,大家只是平时没怎么见到这样的布局方法,要是您对这样的布局感兴趣,那就期待本站有关更新吧。

上一节:《Web布局连载——两栏固定布局(三)

如需转载,烦请注明出处:http://www.w3cplus.com/css/layout/fixed-layout/two-columns-4.html


2012年优秀jQuery插件连载(六)

$
0
0
2012年优秀jQuery插件连载(六)

几篇连载下来,W3cplus已经向大家推荐过五个jQuery插件了,不知道大家是否喜欢这些插件,也不知道大家工作中是否能使用上。今天继续为大家推荐第51个至第60个jQuery插件。今天这十个插件涉及Web中各个方面的,比如说有幻灯片制作的、弹出窗口的、图片截取的、提示框的、数据图表的、媒体分享等插件。希望这些插件对大家有所帮助。

如果你有兴趣的话,可以先回顾一下前五十个jQuery的插件:

  1. 2012年优秀jQuery插件连载(一)
  2. 2012年优秀jQuery插件连载(二)
  3. 2012年优秀jQuery插件连载(三)
  4. 2012年优秀jQuery插件连载(四)
  5. 2012年优秀jQuery插件连载(五)

1、Cropzoom

Cropzoom

CropZoom帮你裁剪图片,而且你可以将裁剪的图片放大,缩小、旋转等。不过这个插件需要jQuery UI中的ui.droppable,ui.resizable,ui.slider配合工作。

2、Touch Supported jQuery Slider Plugin

Touch Supported jQuery Slider Plugin

jQuery Slider是易于使用和多功能jQuery插件,支持任何基于webkit的触摸移动设备如iPhone / iPod / iPad和Android。

3、Lightbox2

Lightbox2

Lightbox是一个简单的jQuery插件。点击列表图片时,会在新窗口中弹出一张大图片,而且你可以根据你自己的需要,设置上下按钮。这个插件适用于所有现代浏览器。

4、FALLR

FALLR

一个简单轻量,上具有多种风格的弹出窗jQuery插件。

5、PowerTip

PowerTip

PowerTip是一个很灵活,可以定制的提示工具插件。

6、Infinite-social-wall

Infinite-social-wall

一款制作社交推广的插件,可以使用他来制作一个媒体墙,现在支持的社交平台有google plus、github、pinterest、twitter、stackoverflow等。

7、jQUIT

jQUIT

jQUIT Builder可以构建定制基于Metro UI的jQuery UI主题。

8、NVD3

jQUIT

NVD3可以用来自定义制作图表。

9、ADAPTOR

ADAPTOR

Adaptor是一款轻量级制作2D和3D效果的幻灯片滑块的jQuery插件。

10、Mosaic

Mosaic

Mosaic是一款制作动态朦板遮照效果。

到这一期结束之时,我们总共给大家介绍了六十个优秀的jQuery插件,如果你是第一次看到这篇文章,那么你也可以继续点击:

  1. 2012年优秀jQuery插件连载(一)
  2. 2012年优秀jQuery插件连载(二)
  3. 2012年优秀jQuery插件连载(三)
  4. 2012年优秀jQuery插件连载(四)
  5. 2012年优秀jQuery插件连载(五)

查看其他五十个jQuery插件。同时希望这些插件对大家今后的工作或者应用有所帮助。我们会继续努力,下一期将为大家推荐一些更优秀的插件,如果你对这些插件感兴趣,请观注w3cplus的更新。如果您有更好的想法,或者想得到其他的资源,可以给我们留言。谢谢!

如需转载,烦请注明出处:http://www.w3cplus.com/source/best-jquery-plus-2012-part6.html

css3对话框设计

$
0
0
css3对话框设计

对话框气泡,总能在一些设计中给人一种清晰的感觉,在这里我们用css3技术来设计了几种对话框。

在第一个案例中,主要使用:before&:after创建两个三角形,一个和背景色一样,一个和边框色一样;在第二个案例中主要使用:before和rotate,利用旋转来达到我们需要的效果;第三个是一个倾斜的三角其实也有两种方法一个就是两个三角形叠加一个就是demo中的旋转了;第四种比较复杂,一两句说不完,还是自己看吧

demodownload

css主要代码如下:

/* demo1 */
.demo1{
    border:2px solid #ccc;
	padding:10px;
	margin-bottom:20px;
	position:relative;
	-moz-border-radius:5px;
    -webkit-border-radius:5px;
    border-radius:5px;
}
.demo1:before,.demo1:after{ 
	content:'';
	width:0;
	height:0;
	position:absolute;
}
.demo1:before{
    left:10px;
	bottom:-8px;
	border-top:8px solid #ccc;
	border-left:8px solid transparent;
	border-right:8px solid transparent;
}
.demo1:after{
    left:12px;
	bottom:-6px;
	border-top:8px solid #fff;
	border-left:6px solid transparent;
	border-right:6px solid transparent;
}
/* demo2 */
.demo2{
    border:2px solid #29B4F0;
	padding:10px;
	position:relative;
	margin-bottom:20px;
	-moz-border-radius:5px;
    -webkit-border-radius:5px;
    border-radius:5px;
}
.demo2:before{
	content:'';
	width:8px;
	height:8px;
	position:absolute;
	left:20px;
	bottom:-7px;
	background-color:#fff;
	border:2px solid #29B4F0;
	border-width: 0 2px 2px 0;
	-webkit-transform:rotate(45deg);
	-moz-transform:rotate(45deg);
	-ms-transform:rotate(45deg);
	-o-transform:rotate(45deg);
	transform:rotate(45deg);
}
/* demo3 */
.demo3{
    background-color:#B6F5FE;
	padding:10px;
	position:relative;
	margin-bottom:20px;
	-moz-border-radius:5px;
    -webkit-border-radius:5px;
    border-radius:5px;
}
.demo3:before,.demo3:after{ 
	content:'';
	width:0;
	height:0;
	position:absolute;
}
.demo3:before{
    left:10px;
	bottom:-18px;
	border-top:30px solid #B6F5FE;
	border-left:8px solid transparent;
	border-right:8px solid transparent;
	-webkit-transform:rotate(50deg);
	-moz-transform:rotate(50deg);
	-ms-transform:rotate(50deg);
	-o-transform:rotate(50deg);
	transform:rotate(50deg);
}
/* demo4 */
.demo4{
    background-color:#82AF11;
	padding:10px;
	color:#fff;
	position:relative;
	text-shadow:0 -1px 1px rgba(0,0,0,.2);
	-moz-border-radius:5px;
    -webkit-border-radius:5px;
    border-radius:5px;
}
.demo4:before{
    content:'';
	width:100px;
	height:20px;
	background-color:#82AF11;
	position:absolute;
	bottom:-20px;
	left:200px;
}
.demo4:after{
    content:'';
	width:50px;
	height:20px;
	background-color:#fff;
	position:absolute;
	bottom:-20px;
	left:200px;
	border-radius:0 20px 0 0;
}
.demo4 > :first-child:before{
     content:'';
	width:50px;
	height:20px;
	background-color:#fff;
	position:absolute;
	bottom:-20px;
	left:250px;
	border-radius:20px 0 0 0;   
}

demodownload

css3背景运动

$
0
0
css3背景运动

两个css3背景运动实例,一个是图片,一个是渐变。关键点就在于定义背景的位置,使之可以循环往复,注意衔接地方不要出现中断啊。这个对不支持的浏览器降级也可以很优雅,第一个就是背景的平铺,至于第二个也可以设置一个背景,或者直接设置一个border-top什么的都可以。

demodownload

第一个实例的主要css3代码:

body{
    background:url('../images/header_bg.png') repeat-x 0 0;
	-moz-animation-name:bgscroll;
	-moz-animation-duration:15s;
	-moz-animation-timing-function:linear;
	-moz-animation-iteration-count:infinite;
		
	-webkit-animation-name:bgscroll;
	-webkit-animation-duration:15s;
	-webkit-animation-timing-function:linear;
	-webkit-animation-iteration-count:infinite;
		
	animation-name:bgscroll;
	animation-duration:15s;
	animation-timing-function:linear;
	animation-iteration-count:infinite;

	padding-top:100px;
}
@-moz-keyframes bgscroll{
    0%{
		background-position: 0 -60px;
	}
	100%{
		background-position: -940px -60px;
	}
}
@-webkit-keyframes bgscroll{
    0%{
		background-position: 0 -60px;
	}
	100%{
		background-position: -940px -60px;
	}
}

demodownload

css3标签设计

$
0
0
css3标签设计

设计了三种常用的文章标签,第一个是圆角效果比较简单,主要思路就是非等的对称的圆角;第二个主要应用了ribbon,使用:before生成;第三个就稍微麻烦点,三角加上一个小圆点,使用:before和:after生成,看来不错啊。

demodownload

主要css代码:

/* demo1 */
.demo1 .tag a{
    background-color:#93BD17;
	color:#fff;
	border-radius:8px 5px 8px 5px;
	text-shadow:0 -1px 0 rgba(0,0,0,.2);
	-webkit-transition:all 0.3s ease;
	-moz-transition:all 0.3s ease;
	-ms-transition:all 0.3s ease;
	-o-transition:all 0.3s ease;
	transition:all 0.3s ease;
}
.demo1 .tag a:hover{
    border-radius:15px 6px 15px 6px;
}
/* demo2 */
.demo2{
    position:relative;
}
.demo2 .tag{
    position:absolute;
	left:-67px;
	top:10px;
}
.demo2 .tag a{
    background-color:#03AEC7;
	color:#fff;
	text-shadow:0 -1px 0 rgba(0,0,0,.2);
	position:relative;
	display:block;
	margin:0 0 10px;
	-webkit-box-shadow:-5px 0 5px -5px rgba(0, 0, 0, 0.3) inset;
	-moz-box-shadow:-5px 0 5px -5px rgba(0, 0, 0, 0.3) inset;
	box-shadow:-5px 0 5px -5px rgba(0, 0, 0, 0.3) inset;
}
.demo2 .tag a:before{
    content:'';
	width:0;
	height:0;
	position:absolute;
	left:-10px;
	top:0;
	border-left:10px solid transparent;
	border-top:12px solid #03AEC7;
	border-bottom:12px solid #03AEC7;
}
/* demo3 */
.demo3 .tag a{
    background-color:#F89406;
	color:#fff;
	text-shadow:0 -1px 0 rgba(0,0,0,.2);
	position:relative;
}
.demo3 .tag a:before{
	content:'';
	width:0;
	height:0;
	position:absolute;
	left:-10px;
	top:0;
	border-right:10px solid #F89406;
	border-top:12px solid transparent;
	border-bottom:12px solid transparent;    
}
.demo3 .tag a:after{
    content:'';
	width:4px;
	height:4px;
	position:absolute;
	left:-4px;
	top:10px;
	background-color:#fff;
	border-radius:4px;
}

demodownload

css3内部虚线框设计

$
0
0
css3内部虚线框设计

第一个使用的是border为虚线,再加上box-shadow来模拟外面的框;第二个使用的:before方法生成一个虚线框,这里注意的是生成的内容定位上下左右各为3px,确定了这个生成内容的大小,另外需要注意的是注意before内容的层级,小心覆盖了你里面的内容,你可以设置background为一个颜色,就知道层级了;第三个是使用的是border和outline方法。outline不支持单边设置,也不支持圆角,所以比起border来outline很是不足啊。

demodownload

主要css代码为:

.inner_dashed{
    text-align:left;
	margin:20px auto;
	width:300px;
	padding:10px;
	background-color:#F1F1F1;
	border-radius:5px;
}
.demo1{
    border:1px dashed #f00;
	box-shadow:0 0 0 3px #F1F1F1;
}
.demo2{
    position:relative;
}
.demo2:before{
    position:absolute;
	content:'';
	top:3px;
	right:3px;
	left:3px;
	bottom:3px;
	border:1px dashed #f00;
	border-radius:5px;
}
.demo2 p{
    position:relative;
}
.demo3{
    border:1px dashed #f00;
	outline:3px solid #F1F1F1;
}

demodownload

纯css3有序列表

$
0
0
纯css3有序列表

这个前面的数字其实和ol的decimal是没有关系的。其实应用的是:before和counter-increment来生成的。而中间的那个空白的间隔其实是border。其余的一些就是圆角,动画什么的。了解了原理,实践操作下吧。

demodownload

主要css代码:

.rounded-list a{
	position: relative;
	display: block;
	padding: .4em .4em .4em 2em;
	*padding: .4em;
	margin: .5em 0;
	background: #ddd;
	color: #444;
	text-decoration: none;
	-moz-border-radius: .3em;
	-webkit-border-radius: .3em;
	border-radius: .3em;
	-webkit-transition: all .3s ease-out;
	-moz-transition: all .3s ease-out;
	-ms-transition: all .3s ease-out;
	-o-transition: all .3s ease-out;
	transition: all .3s ease-out;	
}
.rounded-list a:hover{
	background: #eee;
}
.rounded-list a:hover:before{
	-moz-transform: rotate(360deg);
	-webkit-transform: rotate(360deg);
	-moz-transform: rotate(360deg);
	-ms-transform: rotate(360deg);
	-o-transform: rotate(360deg);
	transform: rotate(360deg);	
}
.rounded-list a:before{
	content: counter(li);
	counter-increment: li;
	position: absolute;	
	left: -1.3em;
	top: 50%;
	margin-top: -1.3em;
	background: #87ceeb;
	height: 2em;
	width: 2em;
	line-height: 2em;
	border: .3em solid #fff;
	text-align: center;
	font-weight: bold;
	-moz-border-radius: 2em;
	-webkit-border-radius: 2em;
	border-radius: 2em;
	-webkit-transition: all .3s ease-out;
	-moz-transition: all .3s ease-out;
	-ms-transition: all .3s ease-out;
	-o-transition: all .3s ease-out;
	transition: all .3s ease-out;
}

demodownload

更多资料:http://www.red-team-design.com/css3-ordered-list-styles

纯css3 lavalamp 菜单效果

$
0
0
纯css3 lavalamp 菜单效果

曾经我们对于jquery实现的lavalamp那是极度热爱啊,现在不用借助jquery,我们用纯css3实现了,过瘾啊。技术的关键在于在菜单的li最后先增加一个空元素来承载那个滑动的东西,再使用css3的兄弟元素选择器~,然后对于不同的li滑过的时候,设置承载滑动的那个元素的left位置。

demodownload

css主要代码:

#lavalamp {
    background: url('lavalamp.png') no-repeat scroll 0 0 transparent;
    height: 16px;
    left: 13px;
    position: absolute;
    top: 0px;
    width: 64px;

    -moz-transition: all 300ms ease;
    -ms-transition: all 300ms ease;
    -o-transition: all 300ms ease;
    -webkit-transition: all 300ms ease;
    transition: all 300ms ease;
}
#lavalamp:hover {
    -moz-transition-duration: 3000s;
    -ms-transition-duration: 3000s;
    -o-transition-duration: 3000s;
    -webkit-transition-duration: 3000s;
    transition-duration: 3000s;
}
#nav li:nth-child(1):hover ~ #lavalamp {
    left: 13px;
}
#nav li:nth-child(2):hover ~ #lavalamp {
    left: 90px;
}
#nav li:nth-child(3):hover ~ #lavalamp {
    left: 170px;
}
#nav li:nth-child(4):hover ~ #lavalamp {
    left: 250px;
}
#nav li:nth-child(5):hover ~ #lavalamp {
    left: 330px;
}
#nav li:nth-child(6):hover ~ #lavalamp {
    left: 410px;
}
#nav li:nth-child(7):hover ~ #lavalamp {
    left: 490px;
}
#nav li:nth-child(8):hover ~ #lavalamp {
    left: 565px;
}

demodownload

更多资料:http://www.script-tutorials.com/pure-css3-lavalamp-menu/


css3加载动画1

$
0
0
css3加载动画

这是第一个纯css3的loading动画。这个demo的技巧在于先通过:before生成一个外围,这样就形成了两个圆圈,还是以前虚线框里面说的通过上下左右定位为-20px来扩大的外围的圆圈,这些都是静止的。正在运用的其实是一个空span标签设计出来的一个三角形,这里设置的颜色与背景色一直,所以看不出来,其实你可以设置为红色方便观察,就明白了。最后就是animation的运用了。

demodownload

css代码:

#loading {
	margin: 80px auto;
	position: relative;
	width: 100px;
	height: 100px;
	-webkit-border-radius: 50px;
	   -moz-border-radius: 50px;
			border-radius: 50px;
	background: #ccc;
	font: 12px "Lucida Grande", Sans-Serif;
	text-align: center;
	line-height: 100px;
	color: white;
	-webkit-box-shadow: 0 0 5px rgba(0,0,0,0.5);
	-moz-box-shadow: 0 0 5px rgba(0,0,0,0.5);
	box-shadow: 0 0 5px rgba(0,0,0,0.5);		
}
#loading:before {
	content: "";
	position: absolute;
	left: -20px;
	top: -20px;
	bottom: -20px;
	 right: -20px;
	-webkit-border-radius: 70px;
	   -moz-border-radius: 70px;
			border-radius: 70px;
	background: #eee;
	z-index: -2;
	-webkit-box-shadow: inset 0 0 10px rgba(0,0,0,0.2);
	-moz-box-shadow: inset 0 0 10px rgba(0,0,0,0.2);
	box-shadow: inset 0 0 10px rgba(0,0,0,0.2);
}
#loading span {
	position: absolute;
	width: 0;
	height: 0;
	border-left: 50px solid transparent;
	border-right: 50px solid transparent;
	border-top: 80px solid rgba(255,255,255,0.7);
	z-index: -1;
	top: -28px;
	left: 0px;
	-webkit-animation: ticktock 5s linear infinite;
	-webkit-transform-origin: 50px 80px;
	-moz-animation: ticktock 5s linear infinite;
	-moz-transform-origin: 50px 80px;
}
#loading strong {
	overflow: hidden;
	display: block;
	margin: 0 auto;
	-webkit-animation: expand 2.5s linear infinite;
	-moz-animation: expand 2.5s linear infinite;
}

@-webkit-keyframes expand {
	0% {
		width: 0;
	}
	100% {
		width: 60px;
	}
}
@-moz-keyframes expand {
	0% {
		width: 0;
	}
	100% {
		width: 60px;
	}
}               
@-webkit-keyframes ticktock {
	0% {
		-webkit-transform: rotate(0);
	}
	100% {
		-webkit-transform: rotate(360deg);
	}
}
@-moz-keyframes ticktock {
	0% {
		-moz-transform: rotate(0);
	}
	100% {
		-moz-transform: rotate(360deg);
	}
}

demodownload

css3进度条动画

$
0
0
css3进度条动画

这个进度条是应用css3的渐变背景做出来的,然后应用background-size属性设置大小,然后以这个size为单位平铺。分析的时候你可以先禁用animation这个动画,然后可以用firebug设置background-repeat:no-repeat;来查看它一个单元的渐变背景。得到非动画的原理,我们再来研究动画部分,背景图片的运动,当然是用background-position了。

demodownload

css主要代码:

.meter {
    height: 20px;  /* Can be anything */
    position: relative;
    margin: 60px 0 20px 0; /* Just for demo spacing */
    background: #555;
    -moz-border-radius: 25px;
    -webkit-border-radius: 25px;
    border-radius: 25px;
    padding: 10px;
    -webkit-box-shadow: inset 0 -1px 1px rgba(255,255,255,0.3);
    -moz-box-shadow   : inset 0 -1px 1px rgba(255,255,255,0.3);
    box-shadow        : inset 0 -1px 1px rgba(255,255,255,0.3);
}
.meter > span {
    display: block;
    height: 100%;
       -webkit-border-top-right-radius: 8px;
    -webkit-border-bottom-right-radius: 8px;
           -moz-border-radius-topright: 8px;
        -moz-border-radius-bottomright: 8px;
               border-top-right-radius: 8px;
            border-bottom-right-radius: 8px;
        -webkit-border-top-left-radius: 20px;
     -webkit-border-bottom-left-radius: 20px;
            -moz-border-radius-topleft: 20px;
         -moz-border-radius-bottomleft: 20px;
                border-top-left-radius: 20px;
             border-bottom-left-radius: 20px;
    background-color: rgb(43,194,83);
    background-image: -webkit-gradient(
      linear,
      left bottom,
      left top,
      color-stop(0, rgb(43,194,83)),
      color-stop(1, rgb(84,240,84))
     );
    background-image: -moz-linear-gradient(
      center bottom,
      rgb(43,194,83) 37%,
      rgb(84,240,84) 69%
     );
    -webkit-box-shadow: 
      inset 0 2px 9px  rgba(255,255,255,0.3),
      inset 0 -2px 6px rgba(0,0,0,0.4);
    -moz-box-shadow: 
      inset 0 2px 9px  rgba(255,255,255,0.3),
      inset 0 -2px 6px rgba(0,0,0,0.4);
    box-shadow: 
      inset 0 2px 9px  rgba(255,255,255,0.3),
      inset 0 -2px 6px rgba(0,0,0,0.4);
    position: relative;
    overflow: hidden;
}
.meter > span:after, .animate > span > span {
    content: "";
    position: absolute;
    top: 0; left: 0; bottom: 0; right: 0;
    background-image: 
       -webkit-gradient(linear, 0 0, 100% 100%, 
          color-stop(.25, rgba(255, 255, 255, .2)), 
          color-stop(.25, transparent), color-stop(.5, transparent), 
          color-stop(.5, rgba(255, 255, 255, .2)), 
          color-stop(.75, rgba(255, 255, 255, .2)), 
          color-stop(.75, transparent), to(transparent)
       );
    background-image: 
        -moz-linear-gradient(
          -45deg, 
          rgba(255, 255, 255, .2) 25%, 
          transparent 25%, 
          transparent 50%, 
          rgba(255, 255, 255, .2) 50%, 
          rgba(255, 255, 255, .2) 75%, 
          transparent 75%, 
          transparent
       );
    z-index: 1;
    -webkit-background-size: 50px 50px;
    -moz-background-size: 50px 50px;
    background-size: 50px 50px;
    -webkit-animation: move 2s linear infinite;
    -moz-animation: move 2s linear infinite;
       -webkit-border-top-right-radius: 8px;
    -webkit-border-bottom-right-radius: 8px;
           -moz-border-radius-topright: 8px;
        -moz-border-radius-bottomright: 8px;
               border-top-right-radius: 8px;
            border-bottom-right-radius: 8px;
        -webkit-border-top-left-radius: 20px;
     -webkit-border-bottom-left-radius: 20px;
            -moz-border-radius-topleft: 20px;
         -moz-border-radius-bottomleft: 20px;
                border-top-left-radius: 20px;
             border-bottom-left-radius: 20px;
    overflow: hidden;
}

.animate > span:after {
    display: none;
}

@-webkit-keyframes move {
    0% {
       background-position: 0 0;
    }
    100% {
       background-position: 50px 50px;
    }
}

@-moz-keyframes move {
    0% {
       background-position: 0 0;
    }
    100% {
       background-position: 50px 50px;
    }
}


.orange > span {
    background-color: #f1a165;
    background-image: -moz-linear-gradient(top, #f1a165, #f36d0a);
    background-image: -webkit-gradient(linear,left top,left bottom,color-stop(0, #f1a165),color-stop(1, #f36d0a));
    background-image: -webkit-linear-gradient(#f1a165, #f36d0a); 
}

.red > span {
    background-color: #f0a3a3;
    background-image: -moz-linear-gradient(top, #f0a3a3, #f42323);
    background-image: -webkit-gradient(linear,left top,left bottom,color-stop(0, #f0a3a3),color-stop(1, #f42323));
    background-image: -webkit-linear-gradient(#f0a3a3, #f42323);
}

.nostripes > span > span, .nostripes > span:after {
    -webkit-animation: none;
    -moz-animation: none;
    background-image: none;
}

demodownload

更多资料:http://css-tricks.com/css3-progress-bars/

Transition动画在Chrome中闪动

$
0
0

Chrome在渲染transition时会出现闪动,添加以下css样式既可以:

-webkit-backface-visibility: hidden;
//或者
-webkit-transform-style: preserve-3d;

css3 slideup box

$
0
0
css3 slideup box

本实例主要是对css3的transition属性的应用,同时应用了rotate旋转和nth-child子元素选择器。原理是先设置容器为一定的高度并overflow为hidden,然后标题的高度为整个高度且opacity为1,而内容为一定的rotate角度且opacity为0。当鼠标滑过的时候标题margin为负的容器高度,opacity为0,而内容的rotate为0,opacity为1。当然最关键的是我们的transition的应用,把这些变化动画化。而内容的背景图片就充分应用了nth-child子元素选择器

demodownload

css主要代码为:

.slide-up-boxes a {
    display: block; 
    height: 130px; 
    margin: 0 0 20px 0; 
    background: rgba(215, 215, 215, 0.5); 
    border: 1px solid #ccc; 
    height: 65px; 
    overflow: hidden; 
}

.slide-up-boxes h5 { 
    color: #333; 
    text-align: center;
    height: 65px; 
    font: italic 18px/65px Georgia, Serif;    /* Vertically center text by making line height equal to height */
     opacity: 1;
     -webkit-transition: all 0.2s linear; 
     -moz-transition: all 0.2s linear; 
     -o-transition: all 0.2s linear;
}

.slide-up-boxes a:hover h5 { 
    margin-top: -65px; 
    opacity: 0; 
}

.slide-up-boxes div { 
    position: relative; 
    color: white; 
    font: 12px/15px Georgia, Serif;
    height: 45px; 
    padding: 10px; 
    opacity: 0; 
    -webkit-transform: rotate(6deg); 
    -webkit-transition: all 0.4s linear; 
    -moz-transform: rotate(6deg); 
    -moz-transition: all 0.4s linear; 
    -o-transform: rotate(6deg); 
    -o-transition: all 0.4s linear; 
}
.slide-up-boxes a:hover div { 
    opacity: 1; 
    -webkit-transform: rotate(0); 
    -moz-transform: rotate(0); 
    -o-transform: rotate(0); 
}
.slide-up-boxes a:nth-child(1) div { background: #c73b1b url(images/wufoo.png) 17px 17px no-repeat; padding-left: 120px; }
.slide-up-boxes a:nth-child(2) div { background: #367db2 url(images/diw.png) 21px 10px no-repeat; padding-left: 90px; }
.slide-up-boxes a:nth-child(3) div { background: #393838 url(images/qod.png) 14px 16px no-repeat; padding-left: 133px; }

demodownload

查看更多:http://css-tricks.com/video-screencasts/93-css3-slideup-boxes/

css3加载动画2

$
0
0
css3加载动画2

其实分析每个css3的案例动画,首先做的应该是先把动画停下来,了解下初始是怎么样的。如这个我们一开始看到这么绚的动画加载效果,一般都认为比较难,但是先把animation这个属性通过firebug禁用后,发现原来原理并不是很复杂,只是运用了border,border-radius和box-shadow,然后给就是rotate的animation。第二个和第一个原理一样,只是设置的border-color四个值不一样罢了。而第三个则是使用不同的延迟时间引发scale的动画。至于暂停按钮则是通过js来添加stop这个class,stop则设置了animation-play-state:paused;

demodownload

css主要代码为:

/* STOP ANIMATION */

.stop {
	-webkit-animation-play-state:paused;
	-moz-animation-play-state:paused;
}

/* Loading Circle */
.ball {
	background-color: rgba(0,0,0,0);
	border:5px solid rgba(0,183,229,0.9);
	opacity:.9;
	border-top:5px solid rgba(0,0,0,0);
	border-left:5px solid rgba(0,0,0,0);
	border-radius:50px;
	box-shadow: 0 0 35px #2187e7;
	width:50px;
	height:50px;
	margin:0 auto;
	-moz-animation:spin .5s infinite linear;
	-webkit-animation:spin .5s infinite linear;
}

.ball1 {
	background-color: rgba(0,0,0,0);
	border:5px solid rgba(0,183,229,0.9);
	opacity:.9;
	border-top:5px solid rgba(0,0,0,0);
	border-left:5px solid rgba(0,0,0,0);
	border-radius:50px;
	box-shadow: 0 0 15px #2187e7; 
	width:30px;
	height:30px;
	margin:0 auto;
	position:relative;
	top:-50px;
	-moz-animation:spinoff .5s infinite linear;
	-webkit-animation:spinoff .5s infinite linear;
}

@-moz-keyframes spin {
	0% { -moz-transform:rotate(0deg); }
	100% { -moz-transform:rotate(360deg); }
}
@-moz-keyframes spinoff {
	0% { -moz-transform:rotate(0deg); }
	100% { -moz-transform:rotate(-360deg); }
}
@-webkit-keyframes spin {
	0% { -webkit-transform:rotate(0deg); }
	100% { -webkit-transform:rotate(360deg); }
}
@-webkit-keyframes spinoff {
	0% { -webkit-transform:rotate(0deg); }
	100% { -webkit-transform:rotate(-360deg); }
}

/* Second Loadin Circle */

.circle {
	background-color: rgba(0,0,0,0);
	border:5px solid rgba(0,183,229,0.9);
	opacity:.9;
	border-right:5px solid rgba(0,0,0,0);
	border-left:5px solid rgba(0,0,0,0);
	border-radius:50px;
	box-shadow: 0 0 35px #2187e7;
	width:50px;
	height:50px;
	margin:0 auto;
	-moz-animation:spinPulse 1s infinite ease-in-out;
	-webkit-animation:spinPulse 1s infinite linear;
}
.circle1 {
	background-color: rgba(0,0,0,0);
	border:5px solid rgba(0,183,229,0.9);
	opacity:.9;
	border-left:5px solid rgba(0,0,0,0);
	border-right:5px solid rgba(0,0,0,0);
	border-radius:50px;
	box-shadow: 0 0 15px #2187e7; 
	width:30px;
	height:30px;
	margin:0 auto;
	position:relative;
	top:-50px;
	-moz-animation:spinoffPulse 1s infinite linear;
	-webkit-animation:spinoffPulse 1s infinite linear;
}

@-moz-keyframes spinPulse {
	0% { -moz-transform:rotate(160deg); opacity:0; box-shadow:0 0 1px #2187e7;}
	50% { -moz-transform:rotate(145deg); opacity:1; }
	100% { -moz-transform:rotate(-320deg); opacity:0; }
}
@-moz-keyframes spinoffPulse {
	0% { -moz-transform:rotate(0deg); }
	100% { -moz-transform:rotate(360deg);  }
}
@-webkit-keyframes spinPulse {
	0% { -webkit-transform:rotate(160deg); opacity:0; box-shadow:0 0 1px #2187e7; }
	50% { -webkit-transform:rotate(145deg); opacity:1;}
	100% { -webkit-transform:rotate(-320deg); opacity:0; }
}
@-webkit-keyframes spinoffPulse {
	0% { -webkit-transform:rotate(0deg); }
	100% { -webkit-transform:rotate(360deg); }
}

/* LITTLE BAR */

.barlittle {
	background-color:#2187e7;  
	background-image: -moz-linear-gradient(45deg, #2187e7 25%, #a0eaff); 
	background-image: -webkit-linear-gradient(45deg, #2187e7 25%, #a0eaff);
	border-left:1px solid #111; border-top:1px solid #111; border-right:1px solid #333; border-bottom:1px solid #333; 
	width:10px;
	height:10px;
	float:left;
	margin-left:5px;
    opacity:0.1;
	-moz-transform:scale(0.7);
	-webkit-transform:scale(0.7);
	-moz-animation:move 1s infinite linear;
	-webkit-animation:move 1s infinite linear;
}
#block_1{
 	-moz-animation-delay: .4s;
	-webkit-animation-delay: .4s;
 }
#block_2{
 	-moz-animation-delay: .3s;
	-webkit-animation-delay: .3s;
}
#block_3{
 	-moz-animation-delay: .2s;
	-webkit-animation-delay: .2s;
}
#block_4{
 	-moz-animation-delay: .3s;
	-webkit-animation-delay: .3s;
}
#block_5{
 	-moz-animation-delay: .4s;
	-webkit-animation-delay: .4s;
}
@-moz-keyframes move{
	0%{-moz-transform: scale(1.2);opacity:1;}
	100%{-moz-transform: scale(0.7);opacity:0.1;}
}
@-webkit-keyframes move{
	0%{-webkit-transform: scale(1.2);opacity:1;}
	100%{-webkit-transform: scale(0.7);opacity:0.1;}
}

demodownload

查看更多:http://www.alessioatzeni.com/blog/css3-loading-animation-loop/

纯css3手风琴效果1

$
0
0
纯css3手风琴效果1

本实例通过对radio按钮的状态判断来实现折叠效果。主要应用的是兄弟元素选择器~,注意这个兄弟元素选择器只选择后面的兄弟元素,对于同级的前面的兄弟元素css3还没有响应的选择器。然后综合应用:before和transition来实现前面图标的切换及高度的伸展动画。这个高度的伸展变化必须设置一个具体的值,如为auto则没有transition动画效果,只是切换而已。

demodownload

css主要代码为:

#accordion{
	border:1px solid #D2D2D2;
	border-top:none;
	width:600px;
}
#accordion input[type='radio']{
	display:none;
}
#accordion label{
	display:block;
	font-size:16px;
	background-color:#F4F4F4;
	border-top:1px solid #D2D2D2;
	line-height:36px;
	font-weight:bold;
}
#accordion label:before{
	content:"\2610";
	background-color:#fff;
	width:19px;
	height:19px;
	-moz-border-radius:10px;
	-webkit-border-radius:10px;
	border-radius:10px;
	text-align:center;
	margin:0 5px;
	box-shadow:0 0 1px rgba(0,0,0,0.5);
	display:inline-block;*display:inline;*zoom:1;
	line-height:19px;
	vertical-align:middle;
}
#accordion .accordion-content{
	height:0;
	overflow:hidden;
	-webkit-transition:height 0.3s ease;
	-moz-transition:height 0.3s ease;
	-ms-transition:height 0.3s ease;
	-o-transition:height 0.3s ease;
	transition:height 0.3s ease;
}
#accordion .accordion-content p{
	margin:10px;
}
#accordion input:checked + label:before{
	content:"\2611";
	color:#f00;
	box-shadow:0 0 2px rgba(255,0,0,0.5);
}
#accordion input:checked ~ .accordion-content{
	height:100px;
}

demodownload

纯css3手风琴效果2

$
0
0
纯css3手风琴效果2

这三个案例实际上就是用了两种技术,一个是radio来控制,一个是checkbox来控制,用radio表示只有一个可以展开(radio的只有一个是选中状态),而checkbox则表示可以同时展开多个(checkbox可以多个选中)。其实道理都是一样的,对radio或者checkbox的选中状态进行判断,然后决定其下面的兄弟元素的高度。

demodownload

css主要代码:

.ac-container {
    margin: 10px auto 30px;
    text-align: left;
    width: 400px;
}
.ac-container label {
    background: -moz-linear-gradient(center top , #FFFFFF 1%, #EAEAEA 100%) repeat scroll 0 0 transparent;
    box-shadow: 0 0 0 1px rgba(155, 155, 155, 0.3), 1px 0 0 0 rgba(255, 255, 255, 0.9) inset, 0 2px 2px rgba(0, 0, 0, 0.1);
    color: #777777;
    cursor: pointer;
    display: block;
    font-family: 'BebasNeueRegular','Arial Narrow',Arial,sans-serif;
    font-size: 19px;
    height: 30px;
    line-height: 33px;
    padding: 5px 20px;
    position: relative;
    text-shadow: 1px 1px 1px rgba(255, 255, 255, 0.8);
    z-index: 20;
}
.ac-container label:hover {
    background: none repeat scroll 0 0 #FFFFFF;
}
.ac-container input:checked + label, .ac-container input:checked + label:hover {
    background: none repeat scroll 0 0 #C6E1EC;
    box-shadow: 0 0 0 1px rgba(155, 155, 155, 0.3), 0 2px 2px rgba(0, 0, 0, 0.1);
    color: #3D7489;
    text-shadow: 0 1px 1px rgba(255, 255, 255, 0.6);
}
.ac-container label:hover:after, .ac-container input:checked + label:hover:after {
    background: url("../images/arrow_down.png") no-repeat scroll center center transparent;
    content: "";
    height: 24px;
    position: absolute;
    right: 13px;
    top: 7px;
    width: 24px;
}
.ac-container input:checked + label:hover:after {
    background-image: url("../images/arrow_up.png");
}
.ac-container input {
    display: none;
}
.ac-container article {
    -moz-transition: height 0.3s ease-in-out 0s, box-shadow 0.6s linear 0s;
    background: none repeat scroll 0 0 rgba(255, 255, 255, 0.5);
    height: 0;
    margin-top: -1px;
    overflow: hidden;
    position: relative;
    z-index: 10;
}
.ac-container article p {
    color: #777777;
    font-size: 14px;
    font-style: italic;
    line-height: 23px;
    padding: 20px;
    text-shadow: 1px 1px 1px rgba(255, 255, 255, 0.8);
}
.ac-container input:checked ~ article {
    -moz-transition: height 0.5s ease-in-out 0s, box-shadow 0.1s linear 0s;
    box-shadow: 0 0 0 1px rgba(155, 155, 155, 0.3);
}
.ac-container input:checked ~ article.ac-small {
    height: 140px;
}
.ac-container input:checked ~ article.ac-medium {
    height: 180px;
}
.ac-container input:checked ~ article.ac-large {
    height: 230px;
}

demodownload

查看更多:http://tympanus.net/codrops/2012/02/21/accordion-with-css3/


纯css3手风琴效果3

$
0
0
纯css3手风琴效果3

本实例主要是对css3的:target这个选择器的应用,通过:target这个状态来改变需要改变的元素。主要就是在设计html结构的时候得想一下,各个点击的href值对应各自要展开内容的id值。最有可能迷惑的就是:target这个选择器的运用,刚接触的时候还是有些晕的,多看看理解理解就好了。

demodownload

css主要代码:

.accordion h3 + div {
        height: 0;
        overflow: hidden;
        -webkit-transition: height 0.3s ease-in;
        -moz-transition: height 0.3s ease-in;
        -o-transition: height 0.3s ease-in;
        -ms-transition: height 0.3s ease-in;
        transition: height 0.3s ease-in;
}

.accordion :target h3 + div {
        height: 100px;
}

.accordion .section.large:target h3 + div {
        overflow: auto;
}

demodownload

查看更多:http://www.paulrhayes.com/2009-06/accordion-using-only-css/

css3层次堆叠效果

$
0
0
css3层次堆叠效果

这种实例其实在css3刚出的时候就比较风靡了,也算是入门级的很好实例吧,还是很值得去练练手的。它主要是对css3的:before和:after的应用,当然再加上一些rotate的旋转及box-shadow的阴影,最后配以:hover来达到动画的效果。由于webkit内核不支持:hover之后其他元素的动画效果(如:hover:before;:hover *;:hover + *),所以该实例用webkit内核浏览器来看,鼠标滑过直接就到生硬的最后状态,没有动画过程。

demodownload

.stack { position: relative; z-index: 10; }
 
/* Image styles */
.stack img { max-width: 100%; height: auto; vertical-align: bottom; border: 10px solid #fff; border-radius: 3px;
    -webkit-box-sizing: border-box;
    -moz-box-sizing: border-box;
    box-sizing: border-box;
    -webkit-box-shadow: 0 1px 4px rgba(0, 0, 0, 0.4);
    -moz-box-shadow: 0 1px 4px rgba(0, 0, 0, 0.4);
    box-shadow: 0 1px 4px rgba(0, 0, 0, 0.4);
}
 
/* Stacks creted by the use of generated content */
.stack:before, .stack:after { content: ""; border-radius: 3px; width: 100%; height: 100%; position: absolute; border: 10px solid #fff; left: 0;
    -webkit-box-sizing: border-box;
    -moz-box-sizing: border-box;
    box-sizing: border-box;
    -webkit-box-shadow: 0 1px 4px rgba(0, 0, 0, 0.4);
    -moz-box-shadow: 0 1px 4px rgba(0, 0, 0, 0.4);
    box-shadow: 0 1px 4px rgba(0, 0, 0, 0.4);
    -webkit-transition: 0.3s all ease-out;
    -moz-transition: 0.3s all ease-out;
    transition: 0.3s all ease-out;
}
.stack:before { top: 4px; z-index: -10; } /* 1st element in stack (behind image) */
.stack:after { top: 8px; z-index: -20; } /* 2nd element in stack (behind image) */

/* Second stack example (rotated to the right from the bottom left) */
.stack.rotated:before {
    -webkit-transform-origin: bottom left;
    -moz-transform-origin: bottom left;
    transform-origin: bottom left;
    -webkit-transform: rotate(2deg);
    -moz-transform: rotate(2deg);
    transform: rotate(2deg);
}
.stack.rotated:after {
    -webkit-transform-origin: bottom left;
    -moz-transform-origin: bottom left;
    transform-origin: bottom left;
    -webkit-transform: rotate(4deg);
    -moz-transform: rotate(4deg);
    transform: rotate(4deg);
}

/* Third stack example (One stack element rotated in the opposite direction) */
.stack.twisted:before {
    -webkit-transform: rotate(4deg);
    -moz-transform: rotate(4deg);
    transform: rotate(4deg);
}
.stack.twisted:after {
    -webkit-transform: rotate(-4deg);
    -moz-transform: rotate(-4deg);
    transform: rotate(-4deg);
}

/* Fourth stack example (Similar to the second but rotated left) */
.stack.rotated-left:before {
    -webkit-transform-origin: bottom left;
    -moz-transform-origin: bottom left;
    transform-origin: bottom left;
    -webkit-transform: rotate(-3deg);
    -moz-transform: rotate(-3deg);
    transform: rotate(-3deg);
}
.stack.rotated-left:after {
    -webkit-transform-origin: bottom left;
    -moz-transform-origin: bottom left;
    transform-origin: bottom left;
    -webkit-transform: rotate(-6deg);
    -moz-transform: rotate(-6deg);
    transform: rotate(-6deg);
}

/* Reset all rotations on hover */
.stack:hover:before, .stack:hover:after {
    -webkit-transform: rotate(0deg);
    -moz-transform: rotate(0deg);
    transform: rotate(0deg);
}

demodownload

查看更多:http://inspectelement.com/tutorials/create-the-illusion-of-stacked-elements-with-css3-pseudo-elements/

css3鼠标滑过动画

$
0
0

本实例共有五个鼠标滑过的动画效果,但其实原理都是差不多。第一个是多加了一个空白的标签,来显示那个遮罩的三角形;第二,三,四都是对却是用border来生成的遮罩,至于第五个效果就比较复杂,不过原理都是一样的,实际应用也不需要那么复杂。所以只需把前面四个简单的学会了,第五个就当做欣赏吧,扩大自己的视野,以后举一反三的机会多的是。说到底,transition的动画变换来变换去,都是那么几个属性,关键在于对基本属性的把握及对动画效果的设计,多看点效果积累点,以后也可以做到得心应手。

demodownload

css主要代码:

.view {
   width: 300px;
   height: 200px;
   margin: 10px;
   float: left;
   border: 5px solid #fff;
   overflow: hidden;
   position: relative;
   text-align: center;
   box-shadow: 0px 0px 5px #aaa;
   cursor: default;
}
.view .mask, .view .content {
   width: 300px;
   height: 200px;
   position: absolute;
   overflow: hidden;
   top: 0;
   left: 0;
}
.view img {
   display: block;
   position: relative;
}
.view a.info {
   background:url(../img/link.png) center no-repeat;
   display: inline-block;
   text-decoration: none;
   padding:0;
   text-indent:-9999px;
   width:20px;
   height:20px;
}

/*demo1*/
.effect img {
   opacity:1;
   transform:scale(1,1);
   transition: all 0.2s ease-in;
}
.effect .mask {
   opacity:0;
   overflow:visible;
   border-color:rgba(0,0,0,0.7) transparent transparent transparent;
   border-style:solid;
   border-width:150px;
   width:0;
   height:0;
   transform:translateY(-125px);
   transition: transform 0.2s 0.1s ease-out, opacity 0.3s ease-in-out;
}
.effect a.info {
   opacity:0;
   transform:translateY(-125px);
   transition: transform 0.3s ease-in, opacity 0.1s ease-in-out;
}
.effect:hover img {
   opacity:0.7;
   transform:scale(2,2);
}
.effect:hover .mask {
   opacity: 1;
   transform: translateY(0px);
}
.effect:hover a.info {
   opacity:1;
   transform:translateY(100px);
}
/*demo2*/
.second-effect .mask {
   opacity: 0;
   overflow:visible;
   border:0px solid rgba(0,0,0,0.7);
   box-sizing:border-box;
   transition: all 0.4s ease-in-out;
}
.second-effect a.info {
   position:relative;
   top:-10px;
   opacity:0;
   transform:scale(0,0);
   transition: transform 0.2s 0.1s ease-in, opacity 0.1s ease-in-out;
}
.second-effect:hover .mask {
   opacity: 1;
   border:100px solid rgba(0,0,0,0.7);
}
.second-effect:hover a.info {
   opacity:1;
   transform:scale(1,1);
   transition-delay:0.3s;
}
/*demo3*/
.third-effect .mask {
   opacity: 0;
   overflow:visible;
   border:100px solid rgba(0,0,0,0.7);
   box-sizing:border-box;
   transition: all 0.4s ease-in-out;
}
.third-effect a.info {
   position:relative;
   top:-10px; /* Center the link */
   opacity: 0;
   transition: opacity 0.5s 0s ease-in-out;
}
.third-effect:hover .mask {
   opacity: 1;
   border:100px solid rgba(0,0,0,0.7);
}
.third-effect:hover a.info {
   opacity:1;
   transition-delay: 0.3s;
}
/*demo4*/
.fourth-effect .mask {
   position:absolute; /* Center the mask */
   top:50px;
   left:100px;
   cursor:pointer;
   border-radius: 50px;
   border-width: 50px;
   display: inline-block;
   height: 100px;
   width: 100px;
   border: 50px solid rgba(0, 0, 0, 0.7);
   box-sizing:border-box;
   opacity:1;
   visibility:visible;
   transform:scale(4);
   transition:all 0.3s ease-in-out;
}
.fourth-effect:hover .mask {
   opacity: 0;
   border:0px solid rgba(0,0,0,0.7);
   visibility:hidden;
}
/*demo5*/
.fifth-effect img {
   opacity:0.2;
   transition: all 0.3s ease-in;
}
.fifth-effect .mask {
   cursor:pointer;
   opacity:1;
   visibility:visible;
   border:100px solid rgba(0,0,0,0.7);
   box-sizing:border-box;
   transition: all 0.4s cubic-bezier(0.940, 0.850, 0.100, 0.620);
}
.fifth-effect:hover .mask {
   border:0px double rgba(0,0,0,0.7);
   opacity:0;
   visibility:hidden;
}
.fifth-effect:hover img {
   opacity:1;
}

demodownload

查看更多:http://www.alessioatzeni.com/blog/css3-hover-effects/

纯css3滚动效果

$
0
0
纯css3滚动效果

看到该实例标题的时候,表示心情十分激动然后再加上一点忑忑,因为以前看过类似的,但是都比较有缺憾,不那么完美。可是这个媲美从前所有的纯css3打造的滚动效果,可以堪称完美了(除了没有导航控制)。只因制作巧妙精美,所以我只表示欣赏而不好加以评论,感兴趣的话大家还是自己手动研究下为好。

demodownload

因css3代码篇幅较长,这里只抽出一部分重要的以供参阅:

#slider li.firstanimation {
	-moz-animation:cycle 25s linear infinite;	
	-webkit-animation:cycle 25s linear infinite;		
}
#slider li.secondanimation {
	-moz-animation:cycletwo 25s linear infinite;
	-webkit-animation:cycletwo 25s linear infinite;		
}
@-moz-keyframes cycle {
	0%  { top:0px; }
	4%  { top:0px; } 
	16% { top:0px; opacity:1; z-index:0; } 
	20% { top:325px; opacity:0; z-index:0; } 
	21% { top:-325px; opacity:0; z-index:-1; }
	92% { top:-325px; opacity:0; z-index:0; }
	96% { top:-325px; opacity:0; }
	100%{ top:0px; opacity:1; }
	
}
@-moz-keyframes cycletwo {
	0%  { top:-325px; opacity:0; }
	16% { top:-325px; opacity:0; }
	20% { top:0px; opacity:1; }
	24% { top:0px; opacity:1; } 
	36% { top:0px; opacity:1; z-index:0; } 
	40% { top:325px; opacity:0; z-index:0; }
	41% { top:-325px; opacity:0; z-index:-1; } 
	100%{ top:-325px; opacity:0; z-index:-1; }
}
...

#slider:hover li, 
#slider:hover .progress-bar {
	-moz-animation-play-state:paused;
	-webkit-animation-play-state:paused;
}
...

#slider .tooltip {
	background:rgba(0,0,0,0.7);
	width:300px;
	height:60px;
	position:relative;
	bottom:75px;
	left:-320px;
	-moz-transition:all 0.3s ease-in-out;
	-webkit-transition:all 0.3s ease-in-out;  
}
#slider .tooltip h1 {
	color:#fff;
	font-size:24px;
	font-weight:300;
	line-height:60px;
	padding:0 0 0 20px;
}
#slider li#first:hover .tooltip, 
#slider li#second:hover .tooltip, 
#slider li#third:hover .tooltip, 
#slider li#fourth:hover .tooltip, 
#slider li#fifth:hover .tooltip {
	left:0px;
}
...

/* PROGRESS BAR */
.progress-bar { 
	position:relative;
	top:-5px;
	width:680px; 
	height:5px;
	background:#000;
	-moz-animation:fullexpand 25s ease-out infinite;
	-webkit-animation:fullexpand 25s ease-out infinite;
}
@-moz-keyframes fullexpand {
    0%, 20%, 40%, 60%, 80%, 100% { width:0%; opacity:0; }
    4%, 24%, 44%, 64%, 84% { width:0%; opacity:0.3; }
   16%, 36%, 56%, 76%, 96% { width:100%; opacity:0.7; }
   17%, 37%, 57%, 77%, 97% { width:100%; opacity:0.3; }
   18%, 38%, 58%, 78%, 98% { width:100%; opacity:0; }	
}

demodownload

查看更多:http://coding.smashingmagazine.com/2012/04/25/pure-css3-cycling-slideshow/

创建一个褶皱带

$
0
0
创建一个褶皱带

本实例主要是对:before,:after和rotate的应用。其实神来之笔在于对border的应用,一般来说我们经常会使用宽高为0,然后再运用border来设计一个三角出来,可是这里是应用border三角和一个宽度或高度的结合,设计出来了我们看到的向上折叠的效果。正好:before生成一个同色的向上折叠,:after生成一个阴影色的旋转下的折叠。

demodownload

css主要代码:

.ribbon:after {
    content: "";   
    display: block;
    width: 40px;
    height: 0px;
     
    position: absolute;
    right: 0;
    bottom: 0px;
    z-index: 20;
     
    border-bottom: 80px solid #de6625;
    border-right: 80px solid transparent;
     
    -webkit-transform: rotate(90deg);
    -webkit-transform-origin: right bottom;
    -moz-transform: rotate(90deg);
    -moz-transform-origin: right bottom;
    -o-transform: rotate(90deg);
    -o-transform-origin: right bottom;
    -ms-transform: rotate(90deg);
    -ms-transform-origin: right bottom;
    transform: rotate(90deg);
    transform-origin: right bottom;
    } 

demodownload

查看更多:http://webdesign.tutsplus.com/tutorials/htmlcss-tutorials/create-a-swish-css3-folded-ribbon-in-5-minutes/

Viewing all 1557 articles
Browse latest View live