CSS画图形在Web运用中时常看到,比如三角形、五角星,心形,Ribbon等。不过以前使用CSS绘制图形一般都是借助于border来绘制,但这样的方式受到一定的限制,而且实用价值也有所限制。这篇文章将介绍使用CSS的clip-path来完成正多边形的绘制,并且借助CSS预处理器Sass给这两种方法定义对应的混合宏和函数,实现正多边形的开发。
border和多个元素绘制多边形
使用border和多个HTML元素绘制三角形,Ribbon等对于我们来说还是易事,也是常见的事,并且实用性、可扩展性并不受到太多限制。但对于一个多边形来说,那就相对而言会麻烦很多了。比如一个正六边形。比如下面的一个示例:
.hexagon {
    width: 100px;
    height: 55px;
    background: red;
    margin: 150px auto;
    position: relative;

    &:before,
    &:after {
        content: "";
        position: absolute;
        width: 0;
        height: 0;
    }

    &:before {
        top: -25px;
        left: 0;
        border-left: 50px solid transparent;
        border-right: 50px solid transparent;
        border-bottom: 25px solid red;
    }
    &:after {
        bottom: -25px;
        left: 0;
        border-left: 50px solid transparent;
        border-right: 50px solid transparent;
        border-top: 25px solid red;
    }
}
将这个示例扩展一下,采用SCSS来写,原理还是使用border和多个HTML元素配合:
$PI:    3.141592653589793;

@mixin border-polygon($num, $color: #000, $radius: 64px) {
    position: relative;
    height: 2.5*$radius;
    width: 2.5*$radius;

    div {
        $halfWidth: tan($PI / $num) * $radius + 1; /* + 1.5 to account for anti-aliasing */
        border-top: #{$radius} solid $color;
        border-left: #{$halfWidth} solid transparent;
        border-right: #{$halfWidth} solid transparent;
        position: absolute;
        left: 50%;
        top: 50%;
        transform-origin: 50% 100%;

        @for $i from 0 through $num {
            &:nth-child(#{$i}) {
                transform: translate(-50%, -100%) rotate(360deg / $num * $i);
            }
        }
    }
}
调用定义好的mixin:border-polygon:
$maxNum: 10;
@for $i from 1 through $maxNum {
    $num: $i + 3;
    .polygon:nth-of-type(#{$i})::after {
        content: "#{$num}";
    }
    .borders .polygon:nth-of-type(#{$i}) {
        @include border-polygon($num, #c00);
    }
}
添加一些额外的CSS,看到的效果如下:
特别声明:在定义SCSS的mixin时,里面用到了多个数学函数,而SCSS并未直接提供原生的函数,因此需要手工定义对应的SCSS函数。不过有一个优秀的SCSS库可以直接拿来使用。这个库就是mathsass。
为了扩展其可用性,添加多个元素并且配合伪类或伪元素来做多一个多边形,就拿六边形来说吧:
<div class="hexagon">
    <a href="##"></a>
    <div class="corner-1"></div>
    <div class="corner-2"></div>
</div>
CSS这样写:
.hexagon{
    width: 150px;
    height: 86px;
    position: relative;
    margin: 150px auto;
    background: #ccc   url("https://unsplash.it/300/300/?random") no-repeat center;
    background-size:auto 173px;

    a {
        width: 100%;
        height: 100%;
        position: absolute;
        top: 0;
        left: 0;
    }

    div {
        position: absolute;
        top: 0;
        left: 0;
        width: 100%;
        height: 100%;
        background: inherit;
        z-index: -2;
        overflow: hidden;
        backface-visibility: hidden;

        &:before {
            width: 173px;
            height: 173px;
            content: '';
            position: absolute;
            background: inherit;
            top: 0;
            left: 0;
            z-index: 1;
            backface-visibility: hidden;
        }
    }

    .corner-1{
        z-index: -1;
        transform: rotate(60deg);

        &:before {
            transform: rotate(-60deg) translate(-87px, 0px);
            transform-origin: 0 0;
        }
    }
    .corner-2 {
        transform: rotate(-60deg);

        &:before {
            transform: rotate(60deg) translate(-48px, -11px);
            bottom: 0;
        }
    }
}
效果如下:
其实现原理不说多,用一张图来说事:

注: 上图来源于@Kevin Liew写的《CREATE BEAUTIFUL HEXAGON SHAPES WITH PURE CSS3》一篇教程中。
clip-path和单个元素绘制多边形
使用border和多个HTML元素,虽然免强能实现我们所需要的效果,并且通过SCSS的扩展,也能很容易绘制任意多边形。但还是较为麻烦。
值得庆幸的是,CSS有一个新属性clip-path可以让我们在一个HTML的元素上绘制任意多的多边形。
下面来看看OXXO.STUDIO的《運用 clip-path的純 CSS 形狀變換》一文中提供的几个示例。先来看看这几个示例:
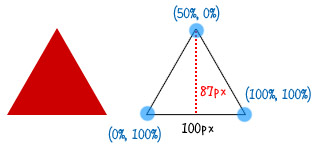
正三角形

div{
    width:100px;
    height:87px;
    background:#c00;
    -webkit-clip-path:polygon(0% 100%, 50%  0%,100% 100%);
}
正四边形(正方形)

div{
    width:100px;
    height:100px;
    background:#069;
    -webkit-clip-path:polygon(0% 0%, 0% 100%,100% 100%,100% 0%);
}
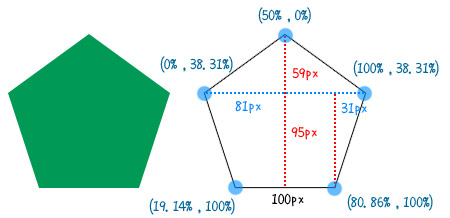
正五边形

正五边形需要计算一下,59/(59+95)=38.31%,31/(81*2)=19.14%:
div{
    width:162px;
    height:154px;
    background:#095;
    -webkit-clip-path:polygon(0% 38.31%, 50% 0%,100% 38.31%,80.86% 100%,19.14% 100%);
}
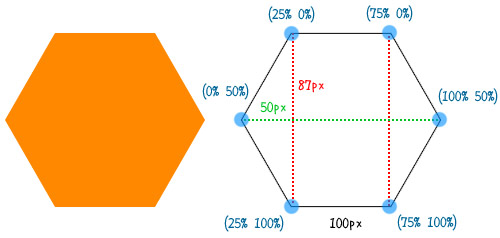
正六边形

正六边形的计算比较简单,50/(100+50*2)=25%,150/(100+50*2)=75%:
div{
    width:200px;
    height:174px;
    background:#f80;
    -webkit-clip-path:polygon(25% 0%, 75% 0%,100% 50%,75% 100%,25% 100%,0% 50%);
}
正七边形

正七边形是这里计算需要的步数是最多的:22/(100+62*2)=10.09%,202/(100+62*2)=90.18%,43/(43+97+78)=19.72%,(43+97)/(43+97+78)=64.22%,62/(100+62*2)=27.68%,(100+62)/(100+62*2)=72.32%:
div{
    width:224px;
    height:218px;
    background:#09c;
    margin: 50px auto;
    -webkit-clip-path:polygon(50% 0%, 90.18% 19.72%,100% 64.22%,72.32% 100%,27.68% 100%,0% 64.22%,10.09% 19.72%);
}
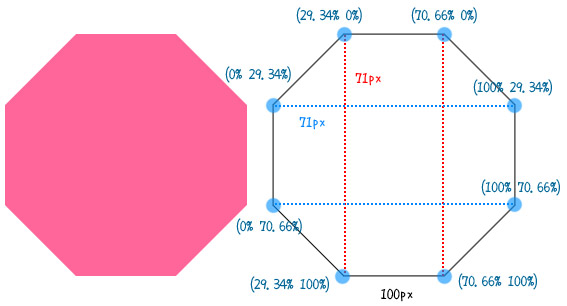
正八边形

正八边形的计算如下:71/(100+71*2)=29.34%,(71+100)/(100+71*2)=70.66%:
div{
    width:242px;
    height:242px;
    background:#f69;
    -webkit-clip-path:polygon(29.34% 0%, 70.66% 0%,100% 29.34%,100% 70.66%,70.66% 100%,29.34% 100%,0% 70.66%,0% 29.34%);
}
上面演示了使用clip-path制作正三边形至正八边形的方法,并且有些正多边形需要通过一定的计算。如果每个都这样人肉去计算,着实让人感到蛋疼。接下来,向大家介绍如何使用SCSS来实现:
@mixin clip-polygon($num, $color, $radius: 64px) {
    position: relative;
    width: $radius*2;
    height: $radius*2;
    background: $color;
    $points: ();
    @for $i from 0 to $num {
        $angle: 360deg/2/$num + 360deg / $num * $i;
        $pointX: 50% + sin($angle)*50%;
        $pointY: 50% + cos($angle)*50%;
        $points: append($points, unquote($pointX+""+$pointY), "comma");
    }
    clip-path: polygon(#{$points});
}
使用SCSS定义了一个clip-polygon的mixins,这样一来可以通过@include来调用定义好的clip-polygon:
$maxNum: 10;
@for $i from 1 through $maxNum {
    $num: $i + 2;
    .polygon:nth-of-type(#{$i})::after {
        content: "#{$num}";
    }
    .clippaths .polygon:nth-of-type(#{$i}) {
        @include clip-polygon($num, #c00);
    }
}
最后的效果如下:
上面的示例效果,直接通过SCSS快速实现了正三边形至正十二边形效果。
除了通过使用SCSS定义混合宏之外,还可以使用SCSS的function来实现:
@function polygon($points, $startPoint: 0) {
    $angle: (360deg / $points);
    $coords: '';
    @for $point from $startPoint through ($points + $startPoint - 1) {
        $pointAngle: $angle * $point;
        $x: 50% + (percentage(sin($pointAngle)) / 2);
        $y: 50% - (percentage(cos($pointAngle)) / 2);
        $coords: $coords + $x + '' + $y;
        @if $point != $points + $startPoint - 1 {
            $coords: $coords + ', ';
        }
        $point: $point + 1;
    }
    $polygon: 'polygon(' + $coords + ')';
    @return unquote($polygon);
}
然后在调用定义好的polygon(),而且这个函数具有两个参数$points,这个参数指的是正多边形的边数;$startPoint指的是开始点,其默认值为0:
$numPoints: 10;
@for $i from 1 through $numPoints {
    $num: $i + 2;
    .clippaths .polygon:nth-of-type(#{$i}) {
        clip-path: polygon($num);
    }
}
配上一些样式,最后效果如下:
总结
分别整理了使用CSS的border和clip-path属性分别使用多个和单个HTML元素绘制正多边形的效果,而且结合CSS的预处理器SCSS定义相应的混合宏和函数来实现正多边形的效果。从而解放我们的生产力,提高开发效果。
最后,如果您有更好的方案或者更好的想法,欢迎在下面的评论中与我们一起分享。
如需转载,烦请注明出处:http://www.w3cplus.com/preprocessor/creat-css-polygon-wiht-border-and-clip-path-property.html
